 Tip: How
to create a menu interface for a USB flash drive
Tip: How
to create a menu interface for a USB flash drive
With CD-Menu Creator is it possible to create
a menu interface for a USB flash drive. If you have our tool USB
AutoRun Creator installed in your computer, you can give the USB
flash drive AutoRun capabilities so the menu is opened
automatically when the USB stick is plugged into a USB port. If you
don't have USB AutoRun Creator installed on your computer, the menu
on the USB flash drive must be opened manually.
If you have USB AutoRun Creator installed on your computer,
we recommend you to follow
this tip instead. Otherwise you can follow the steps below. The
tip below describes how to create a menu interface for a USB flash
drive.
How to create a menu interface for a USB flash drive
The following tip will show you how to create a menu interface for a
USB flash drive with CD-Menu Creator:
-
Start SamLogic CD-Menu Creator.
-
Create a simple menu, for example with a title and two buttons.
-
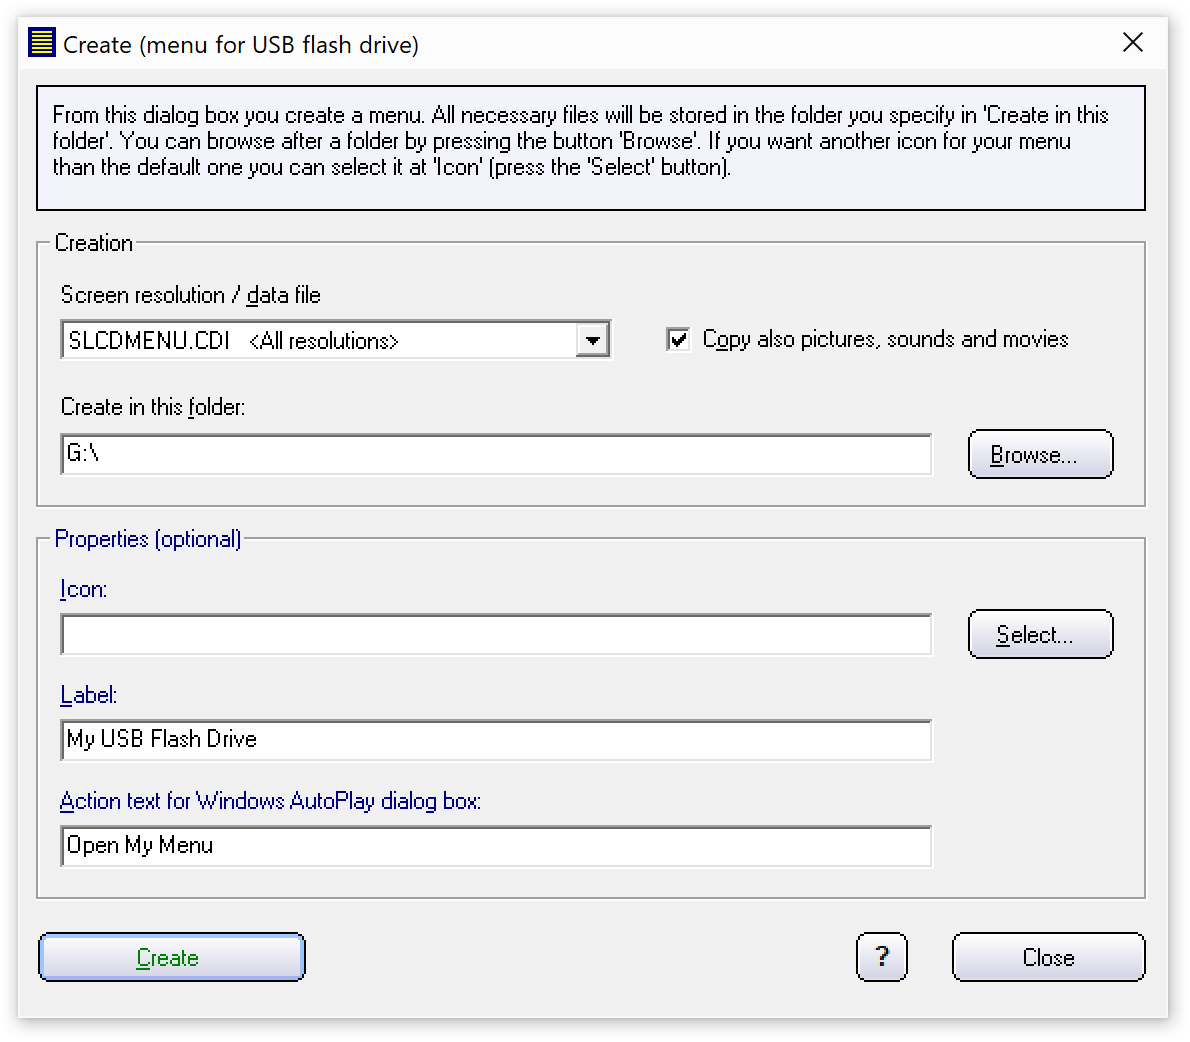
Select the menu item File - Create.
-
Enter the drive letter of your USB flash drive in the Create in this folder text box, for example: "G:\".
-
Enter a label for the USB flash drive in the Label text box, for example: "My USB Flash Drive". This label will be shown in Windows AutoPlay dialog box and in Windows Explorer. Windows AutoPlay is a dialog box that contains a list of possible actions (commands) that can be done with a drive or disc.
-
In the Action text text box you can enter an action text for the Windows AutoPlay dialog box. Some computers with Windows installed will still support this option, altough most computer do not support it anymore. But just in case, you can enter a text here. The text will appear at the top of the list of actions in the AutoPlay dialog, and the user can click on the item to open the menu.
-
Make sure that you have a USB memory stick plugged in the drive letter that you specified at point 4 above. Click the Create button to create a menu.
-
Now has a menu interface been created in the root folder of your USB stick. To test that the menu works, execute the MENU.EXE program file in the root folder.
You can also specify your own icon for the USB flash drive. If you
press the Select button to the right of the Icon text
box, you can browse for an icon. This icon will appear in Windows
AutoPlay dialog box and in Windows Explorer. If no icon is
specified, the CD-Menu Creator's default icon will be used.
Back to Tips and Tricks for CD-Menu Creator
Copyright © by SamLogic. All rights reserved.