Tip:
How to create an installation for
a VB6 application

With our installation tool
Visual Installer you
can create an installation package that installs a VB6
application (Visual Basic 6.0 application) in a very easy
way. Visual Installer can replace the Package and Deployment
Wizard tool, that is included in Visual Basic 6.0, and
create an installer with a
 modern
user interface. Visual Installer will also give additional
functions like license key handling, file component handling and
multi language handling. With Visual Installer you can also code
sign (digitally sign) your installation packages, which will
make installations in restricted environments (like Windows 10)
easier and protect your setup files from viruses or another
malware. modern
user interface. Visual Installer will also give additional
functions like license key handling, file component handling and
multi language handling. With Visual Installer you can also code
sign (digitally sign) your installation packages, which will
make installations in restricted environments (like Windows 10)
easier and protect your setup files from viruses or another
malware.
VB6 runtime files are included automatically
A VB6 application has always support files that must be
distributed with the main program file. Some runtime files, like
MSVBVM60.dll, are fundamental for running a VB6 application.
Without MSVBVM60.dll, and few other runtime files, a VB6
application can not be started. Although these runtime files
often are installed in end-users computers, this is not always
the case. That's why these runtime files always must be a part
of a setup package that installs a VB 6.0 application.
Visual
Installer will automatically include all runtime files that are
necessary to run a VB6 application. During the setup, Visual
Installer will install these files if they are missing in the
end-users computer, in their correct hard disk folders. If they
already exists in the end-user's computer, no file copying will
occur, which makes the installation process faster.
 Visual
Installer knows which ActiveX components to include Visual
Installer knows which ActiveX components to include
Almost all VB6 applications use one or more ActiveX components
in the program. It can be the ActiveX components that follows
Microsoft Visual Basic 6.0, or it can be ActiveX components from
a third party developer (like our
Calendar Components
product). Visual Installer can find out which ActiveX components
that an application uses by analyzing the Visual Basic project
file, and automatically include them in a Visual Installer setup
project. During the setup the ActiveX components will be
installed in their correct folders and also registered in the
system in a proper way (an ActiveX component must always be
registered before use).
In this tip
In the tip below we will show how to import a VB6 project file
to Visual Installer by using Visual Installer's import wizard.
During the import Visual Installer will make an analysis of the
VB6 project file and find out which files to include in the
installation project. Runtimes files and ActiveX components (if
used) are included automatically.
|
How to create an
installation for a VB6 application: |
1. Start Visual Installer and create a new project.
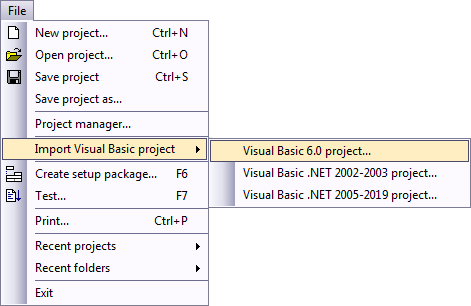
2. Select
the File - Import Visual Basic project - Visual Basic 6.0
project menu item:
3. The
following dialog box is now shown:
4. Click the Select project file button and browse
for a Visual Basic project file (.VBP file).
5. Click the Select program file button and browse
for the program file (.EXE file) of the project. This is the
executable file a user starts to run your application.
6. If your application uses any database you may select
the right option in the Database support group. If your
application does not use any database, you can ignore the
contents of the Database support group.
7. Now click on the Import project button.
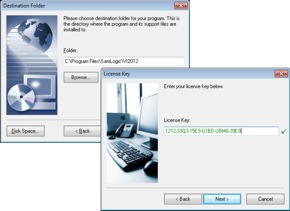
8. In the dialog box that appears, choose a main
destination folder for your application. You can usually use the
default folder that is suggested in the dialog box, so you
should only click OK.
9. Enter a description for the shortcut for your
application, in the new dialog box that is shown.
10. Press OK to continue.
11. The file list in Visual Installer will now be filled
with all files that your application consists of:
In our test project (see the picture above) the name of the main
executable file / main program is TestApp.exe. An ActiveX
component with the filename SLXCal.ocx was also included
in the file list (SLXCal.ocx is a component from our
Calendar
Components toolbox). The rest of files in the file list are
support files that the application is dependent of.
12. Give your project a name by entering a project name
in the Project name text field.
For example "My Test Project".
13. Specify a main destination folder in the Main
folder text field.
For example "%PROGRAMFILES\MyTestApp".
14. Now create a setup package by choosing the File -
Create setup package menu item.
You have now created an installation package that installs a VB6
application. This installation package can be run in all
versions of Windows from Windows 98 to Windows 10.
|
< Tips Index Page
|
 |
Visual
Installer Tip |
|
 |
This tip
is also available as a
video. |
|
|


