Tip:
How to use the User Options dialog
box with script

There is a general option dialog box available in
Visual Installer's setup
wizard that can be used to show different options for the end-user
during an installation. The
name of the dialog box is User Options and in this dialog box
the end-user can select and unselect options that you include in
the setup project. The state of these options can co-operate
with conditional statements in Visual Installer’s
scripting
language, as we will show in the tip below.
|
Part 1 - Activate the
'User Options' setup dialog box: |
In the first part of this tip we will show how to activate the
User Options setup dialog box and add three options to
it.
1. Start Visual Installer and create a new project.
2. Open the Dialog boxes tab in the editor.
3. Select the User options option in the Dialog
boxes tab:
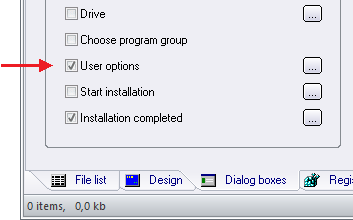
4. Click on the "..." button to the right of the
User options option.
5. A dialog box with the title User options is
opened.
6. Enter the following in the dialog box:
- A dialog title in the Dialog title text box. E.g.
"Choose an option"
- A dialog text in the Dialog text text box. E.g.
"What do you want to do? Choose an option below:"
7. Select option number 1, 2 and 3
in the dialog box.
8. Enter options texts for these three options. The
picture below shows how it may look like:
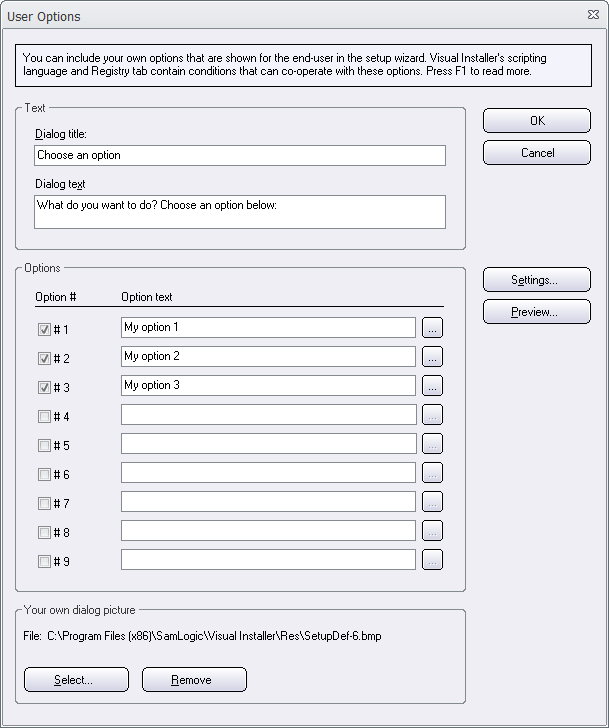
9. Click OK to close the dialog box.
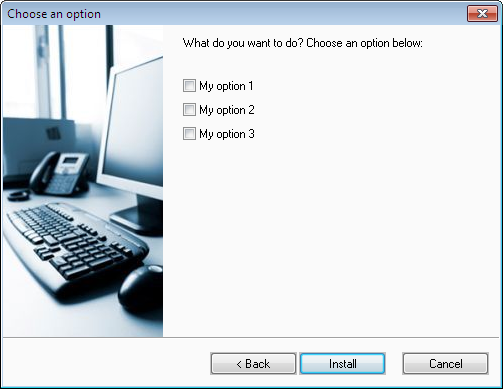
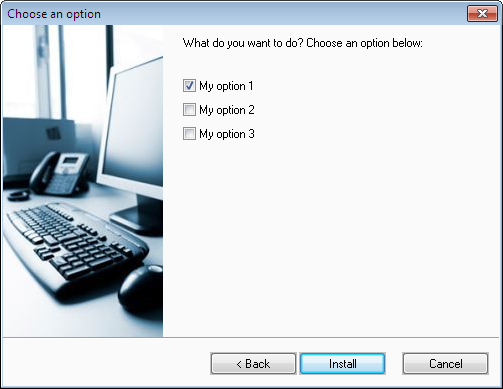
You have now created a dialog box with three options. The
picture below shows how this dialog box may look like during the
installation:
|
Part 2 - Write script
that co-operate with the 'User Options' dialog box: |
In the second part of this tip we will show how to add script
lines that co-operate with the three options that you added in
part 1 of this tip. We will show how to create a simple script
that just shows a message box with the option number for each
option that is selected during the installation.
1. Choose the Special - Execute script commands menu item
in Visual Installer's editor.
2. Open the After installation tab.
3. Enter the following script lines in the script editor:
IF
OPTION(1)=ON
MSGBOX "Information", "Option # 1 was
selected", 1
END IF
IF OPTION(2)=ON
MSGBOX "Information", "Option # 2 was
selected", 1
END IF
IF OPTION(3)=ON
MSGBOX "Information", "Option # 3 was
selected", 1
END IF |
4. The picture below shows how it should look like in the
script editor:
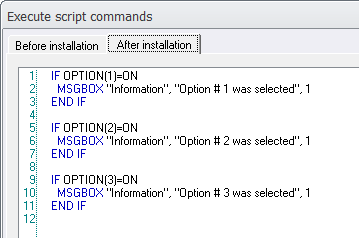
5. Click OK to close the script editor.
|
Part 3 - Test the
installation: |
In the third part of this tip we will test the setup package
that we have created. Follow the tests below to test the
installation:
1. Open the File list tab and enter a project name
and a main destination folder for the installation.
2. Add one or more files to the file list.
3. Choose the File - Create setup package menu
item.
4. Create a setup package.
5. Now you can run your installation. When the following dialog
box is shown during the installation, select option number 1
(the "My option 1" option):
6. After the files in the file list has been copied to your hard
disk, the following message box will be shown on your screen:
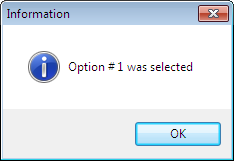
The message box above is shown because the following script
lines is executed:
IF
OPTION(1)=ON
MSGBOX "Information", "Option # 1 was
selected", 1
END IF |
The conditional statement
IF
OPTION(1)=ON
gives true because option 1 was selected in the dialog
box with user options. The other conditional statements give
false, so the lines between
IF
and
END IF
is never executed here.
Just showing message boxes are maybe not so useful, but by
combining the dialog box with user options with conditional
statements in script, you can for example let the user decide if
a specific setup program or a special tool should be run. For
example like this:
IF
OPTION(1)=ON
MSIEXEC %DESTDIR\MySpecialTool.msi,
/qn, WAIT
END IF |
|
< Tips Index Page
|
 |
Visual
Installer Tip |
|
|
Only Professional
Version |
|


