Tip:
How to install an Excel Add-In
using Visual Installer

 The Visual Installer
installation tool can be used to install an Add-in to
Microsoft Excel. This is very easy done in Visual Installer
because there is a built-in functionality in the setup tool to
handle this. There is no need to write complex script lines for
this; you only need to add a single line (!) to the text editor
in the Registry tab in Visual Installer for every Excel Add-in that you want
to install. In this step-by-step tip we will show you exactly
how to achieve this. The Visual Installer
installation tool can be used to install an Add-in to
Microsoft Excel. This is very easy done in Visual Installer
because there is a built-in functionality in the setup tool to
handle this. There is no need to write complex script lines for
this; you only need to add a single line (!) to the text editor
in the Registry tab in Visual Installer for every Excel Add-in that you want
to install. In this step-by-step tip we will show you exactly
how to achieve this.
|
How to install an Excel
Add-In using Visual Installer: |
1. Start Visual Installer and create a new project.
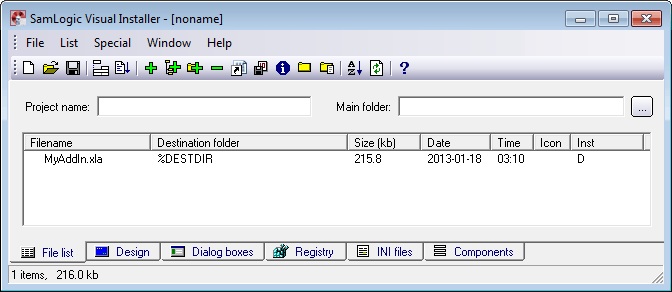
2. Add your
Excel Add-in to the file list by clicking on the
+
sign in the toolbar in the File list tab. In our example
we have added an Add-in with the filename MyAddIn.xla to
the file list:
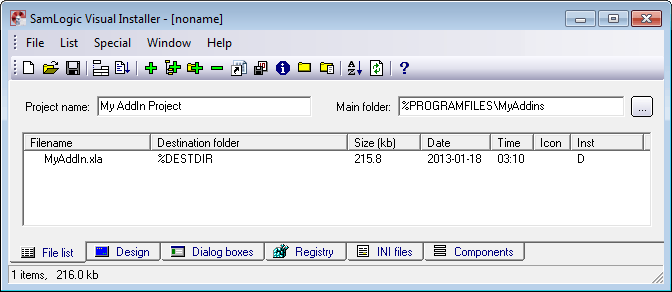
3. Enter a project name in the Project name text
box.
4. Enter a
main destination folder for your Add-in file in the Main
folder
text box. You can install the Add-in file in which folder you
want on the hard disk, but in our example we will use the
following destination folder:
%PROGRAMFILES\MyAddins
5.
The File list tab should now look similar to:
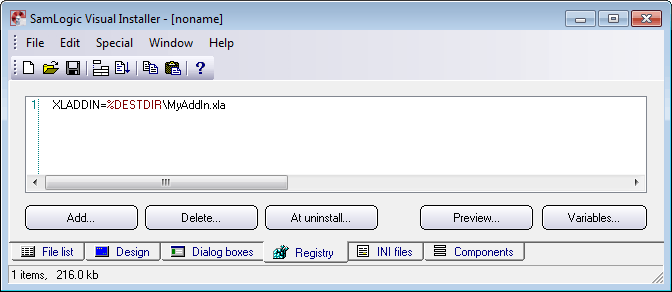
6. Now we will switch to the Registry tab. Click
on the Registry tab to open it up.
7. Enter
the following line in the text editor in the Registry
tab:
XLADDIN=%DESTDIR\MyAddIn.xla
(You can
replace the file path (%DESTDIR\MyAddIn.xla)
with a file path to your own Add-in)
8.
The Registry tab should now look similar to:
9. Save your Visual Installer project file.
10.
Create a setup package via the File - Create setup package
menu item.
|
You have now created an installation package that
installs an Excel Add-in into a Windows computer that
have Microsoft Excel installed. |
|
| Note.
Visual Installer can install both .XLA and
.XLAM Add-ins. |
|
Visual Installer can install the Add-in to all versions of
Microsoft Excel from Excel 97 to Excel 2019. Visual Installer
will automatically detect which version of Microsoft Excel that
is installed, and register the Add-in information in the correct
key in the Windows Registry.
|
< Tips Index Page
|
 |
Visual
Installer Tip |
|
 |
This tip
is also available as a
video. |
|
|


