An ActiveX component must always be registered before use, and
sometimes also a (native) DLL file must be registered before it
can be used. This is very essential in many software projects so
Visual Installer have built-in functions to register ActiveX
components and (native) DLL files.
A .NET assembly needs normally not be be registered, unless you
must call methods in the assembly from native (unmanaged) code.
Then it must be registered also. In this tip we will show how to
use Visual Installer to do such a registration during an
installation.
What is a .NET assembly?
A .NET assembly is an application, component or class
that is compiled for use with Microsoft .NET Framework.
A .NET assembly can have an .EXE filename extension or a
.DLL filename extension. If the filename extension is
.DLL, the assembly is a library assembly and can be used
by other .NET code in an easy way. A .NET assembly can
also be used from native (unmanaged) code if it is
registered properly and a COM object interface (a
COM-callable wrapper) is added to the assembly. |
|
How to register . NET
assembly when using
Visual Installer: |
The steps below show how to activate registration of a .NET
assembly that has been added to a project's file list in Visual
Installer.
1. Start Visual Installer and open your current
installation project, or create a new project.
2. In the file list in the File list tab in the editor,
select the .NET assembly file.
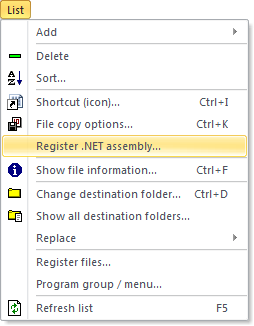
3. Open the List menu.
4. Choose the Register .NET assembly menu item in
the List menu.
5. The following dialog box should now appear:
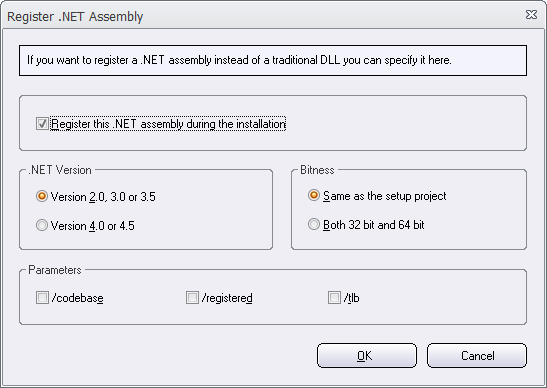
6. Select the Register this .NET assembly during the
installation option in the dialog box.
7. At .NET Version you must inform Visual
Installer which .NET version the assembly is compiled for.
8. At Bitness you must inform Visual Installer
which bitness (32 or 64 bit) the assembly is compiled for.
9. At Parameters you can specify which parameters
to send to the registration tool.
Read more.
10. Click OK to close the dialog box.
Your .NET assembly will now be registered in Windows during the
installation.
Note
The filename extension of the .NET assembly that you add
to the file list must be .DLL. The Register
.NET assembly menu item in the List menu is
only shown if the filename extension is .DLL. If the
filename extension is something else, it is not shown. |
|


