In
the Visual Installer
setup tool there is a tab in the editor that is used to specify
keys and values that should be stored in the Windows Registry during
an installation. The name of the tab is Registry and in
this step-by-step tip we will show you how to use the
Registry tab to store information in Windows Registry. We
will show how to create a key and store a value in the Registry.
The tip interacts with a CD-Menu Creator tip
 This tip interacts with the
How to create a menu that is opened only once
tip; a tip for the menu designer tool
CD-Menu Creator. In the CD-Menu Creator tip we show how to
prevent a menu from appearing in the future by letting the menu
program examine a key and value in Registry. If the key and
value is found, the menu will not be shown anymore. This tip interacts with the
How to create a menu that is opened only once
tip; a tip for the menu designer tool
CD-Menu Creator. In the CD-Menu Creator tip we show how to
prevent a menu from appearing in the future by letting the menu
program examine a key and value in Registry. If the key and
value is found, the menu will not be shown anymore.
This Visual
Installer tip will show you how Visual Installer can be used to
store the key and value (that is read by CD-Menu Creator) in the
Registry. After you have run the example setup, the menu
created with CD-Menu Creator will not be shown anymore.
|
How to write a key and a
value to the Windows Registry: |
1. Start Visual Installer and create a new installation
project.
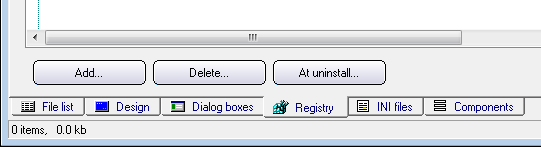
2. Open the Registry tab.
3. Click on the Add button
in the bottom left of the editor window:
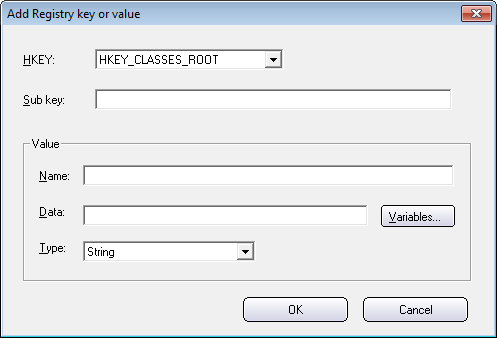
4. The Add Registry key or value dialog box is now
shown:
5. Choose the HKEY_LOCAL_MACHINE root key in the HKEY
drop-down box.
5. Enter the text "Software\SamLogic\NoMenus" in the
Sub key text box.
6. Enter the text "Program1" in the Name text box.
7. Enter "DoNotShowProgram1" in the Data text box.
The dialog box should now look like:
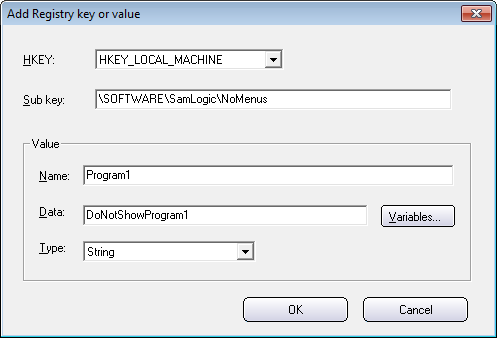
8. Close the dialog box by pressing the OK button.
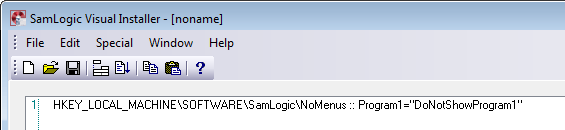
The following line will be added to the text editor in the
Registry tab:
HKEY_LOCAL_MACHINE\SOFTWARE\SamLogic\NoMenus ::
Program1="DoNotShowProgram1"
See also this picture:
9. Now create an installation by choosing the File -
Create setup package menu item.
If you want to test the co-operation with the CD-Menu Creator
tip, you can first follow the CD-Menu Creator tip and insert the
CD/DVD with the menu in your drive. The menu should be shown.
Then you run the setup package created above. The menu should
not be shown anymore. |


