
How To Disable / Turn Off Windows SmartScreen in Windows 8
 In
this article we explained what
Windows SmartScreen is and what it does. Below we will show how
to disable / turn off the SmartScreen function in Microsoft Windows 8.
This is normally not recommended, but there may be situations when you
want to disable Windows SmartScreen temporarily. For example, if you are
a developer and frequently download test versions of your software, then
it may be little annoying to see the Windows protected your PC
warning message (like in the picture below): In
this article we explained what
Windows SmartScreen is and what it does. Below we will show how
to disable / turn off the SmartScreen function in Microsoft Windows 8.
This is normally not recommended, but there may be situations when you
want to disable Windows SmartScreen temporarily. For example, if you are
a developer and frequently download test versions of your software, then
it may be little annoying to see the Windows protected your PC
warning message (like in the picture below):
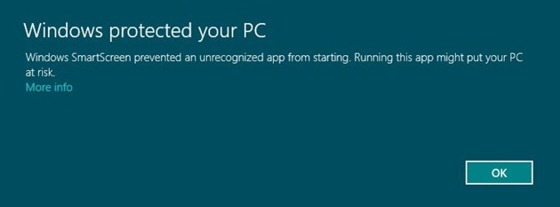
every time you download and try to start your application (app) or make
an installation of it. But by following the steps in the tip below you
can turn off Windows SmartScreen, so the warning message is not showed anymore.
How to disable Windows SmartScreen
Follow the steps below to disable
the Windows SmartScreen function in Windows 8:
1. Switch to Windows Desktop (the classic desktop), if you are not there already.
2. Press the Windows key and C to open up
the charms bar (it will be shown to the right in the screen). You can also move the mouse button to the
upper right or lower right of the screen. The charms bar will
appear then also.
3. In the charms bar that is shown on the
screen, click on Settings. The following options will now be shown:
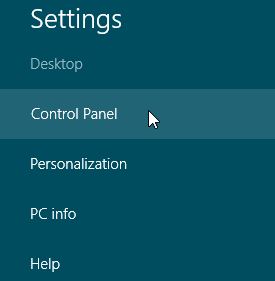
4. Click on the Control Panel option. The Control
Panel for Windows 8 will now be opened.
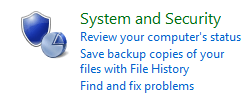
5. In the Control Panel, click on the System and Security
option. It will look like:
6. After that, click on the Action Center
option. The following window
will now be shown:
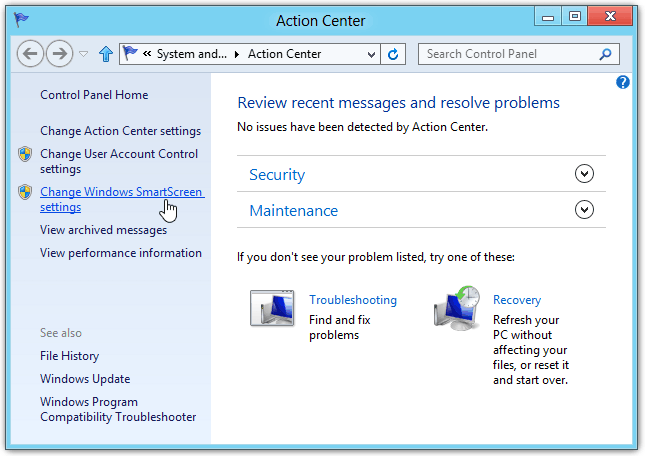
7. Click on Change Windows SmartScreen settings in
the left sidebar. A settings dialog box for Windows SmartScreen is
now shown:
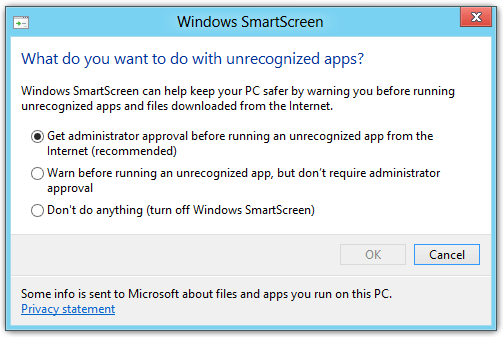
The Windows SmartScreen settings dialog box contains the following three options:
1. Get
administrator approval before running an unrecognized app from
the Internet (recommended)
2. Warn before running an unrecognized app, but don’t
require administrator approval
3. Don’t do anything (turn off Windows SmartScreen) |
8. If you want to turn off the Windows SmartScreen
function completely, so no warning message is shown on the
screen anymore, you can select the third option (Don't do
anything) in the settings dialog box.
9. Press OK and then close the Action Center
window.
That's all you needed to do. Windows SmartScreen is now turned
off in your computer! If you want to turn it on again, follow
the steps above and select the first or second option at step
8.
| There is another way to
go to the Windows SmartScreen settings dialog box
above, that may be faster. Press the Windows key and W, type
"smartscreen" in the Search field, click on Change SmartScreen settings
option to the left, and click on the Change Windows
SmartScreen settings option in the left sidebar in
the Action Center window. The
same settings dialog box is shown. |
|
Don't turn off Windows
SmartScreen permanently
Windows SmartScreen is an effective
protection against malware, so you should only disable it temporarily.
However, if you use a test computer or run a test system virtually,
then it is not necessary to turn it on, so long you are careful and
don't download files that you don't recognize.

Do you want to read more articles
and tips?
If you want to read
more articles and tips about Windows and related topics you can
follow us on
Facebook or
Twitter, or subscribe on our
newsletter. You can also read our
blog. |
|
|
Other articles
More articles are available from the article index page.
|
| The information in this
article is also valid for Windows 8.1. |

|


