|


 Using AutoPlay and AutoRun in Windows 10Also Windows 10 supports the AutoPlay and AutoRun technology, just as previous versions of Microsoft Windows. But there are some differences in how it works and appears on the screen. We will explain the differences, and show how to configure AutoPlay in the Windows 10 operating system, in this article. 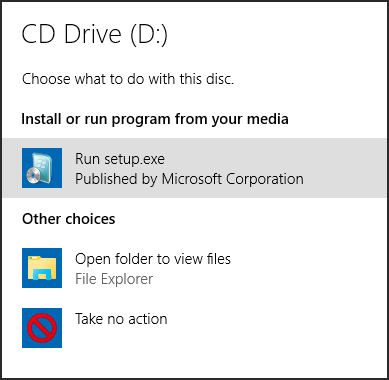 New
behaviour for the
AutoPlay
window New
behaviour for the
AutoPlay
windowIn Windows 7 and earlier, the AutoPlay window was a dialog box that was shown in the center of the screen, when a disc or drive was plugged into a port in the computer. But starting with Windows 8, things work in a different way. First, when the disc or drive is plugged into the port, a notification window is shown on the lower right of the screen. And if you click on the notification window, the AutoPlay window is shown on the upper right of the screen. The picture to the right shows how this window may look like. The AutoPlay window is a window with a list of options that you can choose between to handle the CD, DVD, BD, USB stick or memory card. If the disc or drive contains an installation program, you can for example start the installation by clicking on the Run option in the AutoPlay window. Another common option is the Open folder to view files option. If you click on this option, the File Explorer in Windows is opened with the root drive of the disc / drive opened. Via File Explorer you can browse the contents of the media. Works with CDs, DVDs, BDs, USB sticks and memory cards The AutoPlay window in Windows 10 works with all kind of insertable media, for example with CDs, DVDs, BDs (Blu-ray discs), USB sticks and memory cards. However, the AutoPlay window handling may be turned off for USB sticks and memory cards as default, but it is easy to turn this option on. Below we will show how to enable AutoPlay for USB sticks and other removable drives, and how to enable it for memory cards (SD cards etc.). How to turn on AutoPlay for removable drives and memory cards If you plug in a USB stick into the computer and nothing happens, the AutoPlay function may be turned off for removable drives in the computer. This is often the default behaviour for computers with Windows 10 installed. But you can easily turn this option on, if you prefer to have AutoPlay enabled for USB sticks. To turn on the AutoPlay function for USB sticks, follow the steps below: 1. On Windows start menu, click on the Settings menu item. 2. Click on the Devices icon. 3. Click on the AutoPlay option in the list to the left. 4. Click on the Use AutoPlay for all media and devices option to turn on the AutoPlay option. 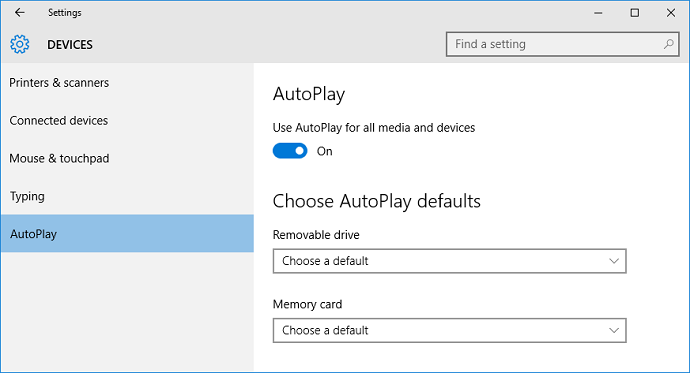 5. In the Removable drive combo box you can choose a default behaviour for USB sticks and other removable drives. You can for example choose the Ask me every time option. Then the AutoPlay window will be shown on the screen (as described earlier in this article). 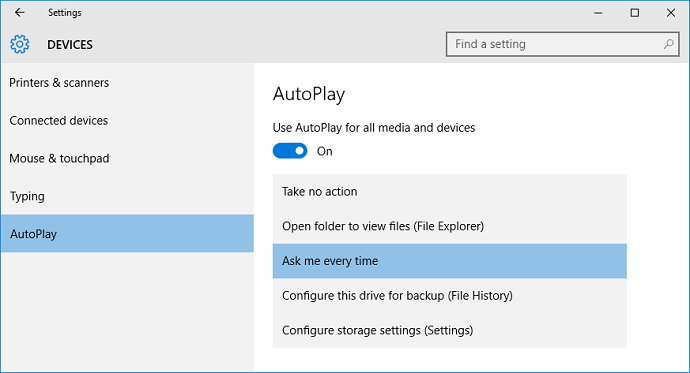 6. Windows 10 supports also AutoPlay for memory cards (for example SD cards). In the Memory card combo box you can choose a default behaviour for memory cards.  7. When you are ready with your settings, you can close the window and plug a USB stick in the USB port to test the AutoPlay function. How to configure AutoPlay for CDs, DVDs and BDs Above we showed how to turn on and configure AutoPlay for removable drives and memory cards. But you can also turn on/off AutoPlay for CDs, DVDs and BDs, and configure them separately. To do this you must use the Control Panel in Windows. Below we will show how: 1. Open the Control Panel. 2. Click on Hardware and Sound. 3. Click on AutoPlay (see the picture below).  4. The window below is now opened: 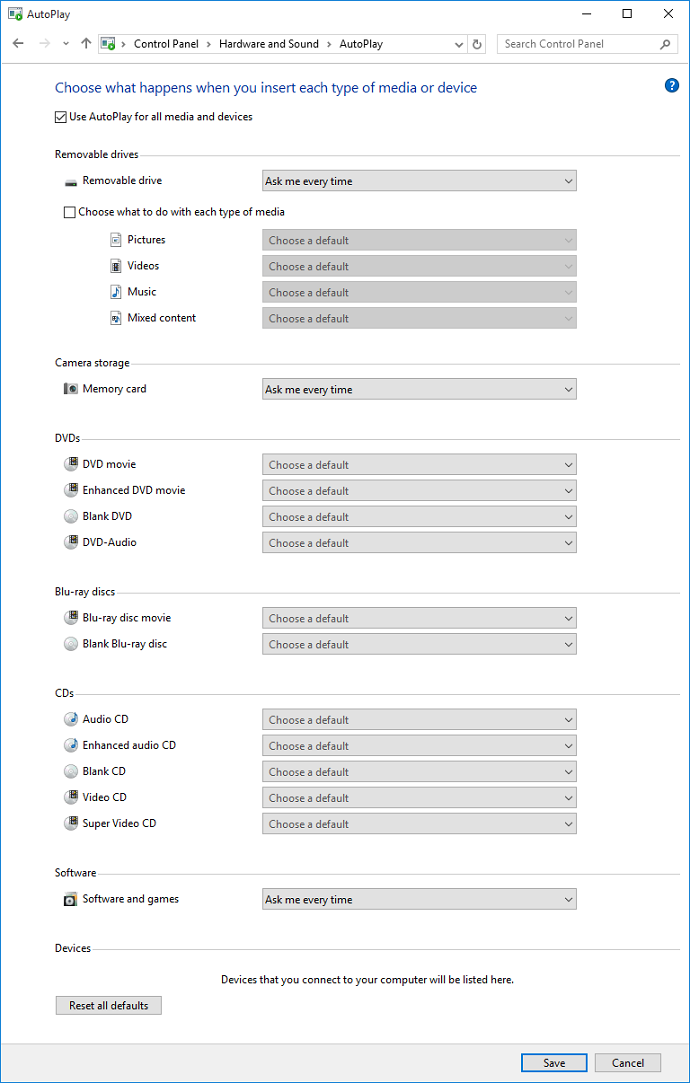 5. Via this window you can inform Windows how to handle different kind of discs and file types. 6. The setting at Software and games will inform Windows how to handle software (e.g. installation programs, apps etc.) that are found on the disc or device. If you choose the Ask me every time option, the AutoPlay window described above will be shown on the screen. 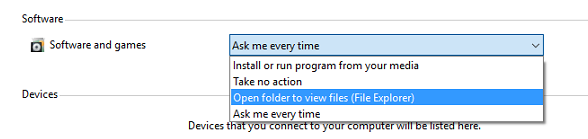 7. After you have done your changes, click on the Save button to save the settings. AutoRun in Windows 10? Windows 10 supports AutoRun, but the support is restricted in the same way as in Windows 7 and Windows 8 for security reasons. Most restricted is the support for USB flash drives. You can get detailed information about how the support for AutoRun is restricted in this article on our web site. If you wonder what is the difference between the AutoPlay and the AutoRun technology, we recommend you to read the What is the Difference Between AutoRun and AutoPlay? article on our web site.
Related products: SamLogic CD-Menu Creator SamLogic USB AutoRun Creator Other articles More articles are available from the article index page. |
|
| Article written by: Mika Larramo |