| Most
installers show setup dialog boxes for the end-user
during the installation, where he/she will get some
useful information, and can for example choose a
destination folder or enter a license key. In Visual
Installer there are many ready-to-use setup dialog boxes
included, and when you create a basic project some of
them are selected as default. In this tip we will use
the dialog boxes that are selected by default and show
how to add text to them. |
|
Add text to setup dialog
boxes |
|
17. |
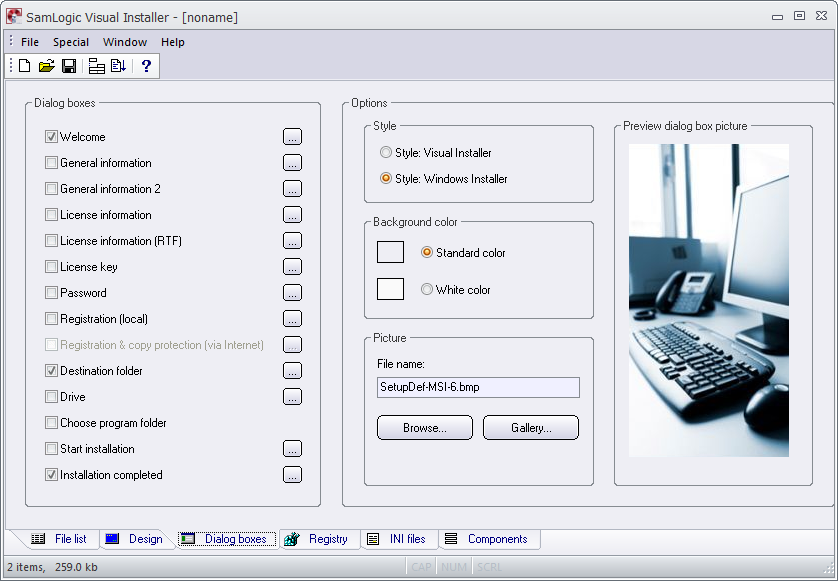
Texts
for setup dialog boxes are handled in the Dialog
boxes tab in the editor. You can open the Dialog
boxes tab by clicking on the tab title in the lower
part of editor's window. The tab will look like this: |
|
18. |
Inside
the Dialog boxes frame (to the left in the tab)
you can choose which setup dialog boxes to include by
selecting them (by setting a check mark). If you click
on the "..." button to the right of a specific dialog
box, you can add or change text, and set some options,
for the dialog boxes. To the right in the tab you can
choose a visual style and choose a picture for the setup
dialog boxes. In this step-by-step tip we will not
change any visual style or dialog box picture, we will
just use the default ones that Visual Installer
suggests. |
|
19. |
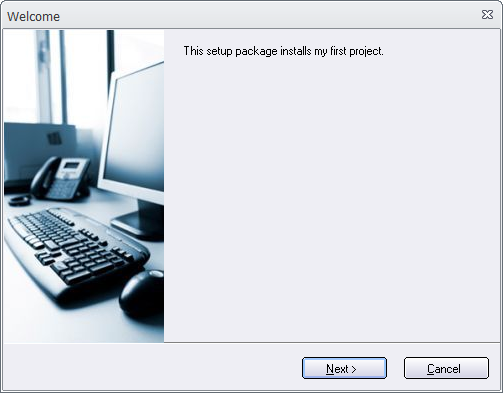
We will now add a text to the Welcome dialog box.
The Welcome dialog box is the first dialog box
that is shown for the user when he/she starts the
installation. Click on the "..." button to the
right of the "Welcome" text to open this dialog box: |

|
20. |
Now
enter a title and a dialog box text. If you want to
preview the result, click on the Preview button.
Visual Installer will now show how the setup dialog box
looks like with your text. For example like this: |
21. You can click on the X button or on Cancel
button to close the dialog box.
22. When you are satisfied with your text, you can click
on OK in the Welcome dialog box to add the text to
the installation.
|
23. |
Now
you can click on the "..." button to the right of
the Installation completed option. Here you can
enter texts that will be shown for the end-user when the
installation box is finished; in the last setup dialog
box in the setup wizard. |
|
24. |
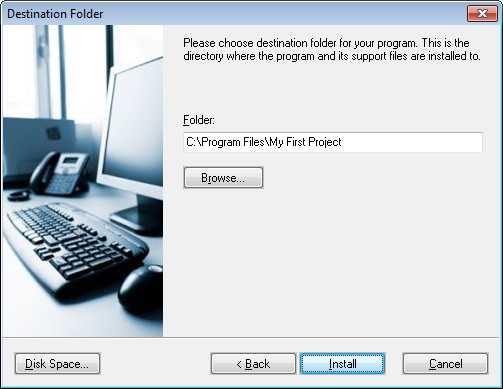
As you
can see in the Dialog boxes frame in the
Dialog boxes tab, also the Destination folder
dialog box is selected. This means that a setup dialog
box that asks for a destination folder will be shown
during the installation. As default, the destination
folder that you specified at step 10 will be shown. The
Destination folder setup dialog box looks like
this: |
|
25. |
All
text in this dialog box can be changed, but we will use
the default text that is created by Visual Installer.
|
|


