The new Visual Studio 2017 will be released on March 7

Visual Studio 2017 Logo

According to Microsoft, the new Visual Studio 2017 will be released on March 7. Visual Studio 2017 is the latest version of Microsoft´s powerful suite of development tools. The first version of Visual Studio was released 1997, so Microsoft will also celebrate Visual Studio’s 20th anniversary when the new version of Visual Studio is released.

Microsoft Visual Studio 2017 includes enhancements to code navigation, IntelliSense, refactoring, debugging, Azure etc. And Xamarin is now integrated in the product which means developers can build Android, iOS and Windows apps directly from Visual Studio. The installation of Visual Studio is also faster and you only need to install the features that you need. Microsoft has also added new features to the C#, C++ and VB languages.

A detailed list of all new features and improvements in Visual Studio 2017 is available here:

> What’s New in Visual Studio 2017
> Visual Studio 2017 Release Notes

Visual Installer 2017 is compatible with Visual Studio 2017
Visual Installer 2017, that we released last week, is fully compatible with Visual Studio 2017 and Visual Basic 2017 (VB 15). This means you can import solution files and project files, that is saved with Visual Studio 2017, to Visual Installer.

Visual Installer 2017 has now been released

We have now released a new version of our setup tool SamLogic Visual Installer. The name of the new version is SamLogic Visual Installer 2017 and the version number is 11.0. Some new features in the new version are:

• The support for Windows 10 has been improved.
• Supports Visual Basic 2017 / Visual Studio 2017.
• Supports AutoCAD 2017.
• Supports Microsoft .NET Framework 4.6.2.
• Supports Microsoft Edge.
• The file information window now displays info about digital certificates. Read more.
• Line breaks can now be included in message boxes that are opened via script. Read more.
• You can specify your own default folder for your Visual Installer project files. Read more.

A detailed list of new features in Visual Installer 2017 is available on this web page.

The file information window now displays info about digital certificates

Today it is important to code sign binary files (for example .EXE and .DLL files) before distribution. We have therefore updated the file information window in Visual Installer so it is easy to check if a file in Visual Installer’s file list is code signed or not. The picture below shows the updated file information window:

The File information window in Visual Installer

To the right of the Code signed? text field there will be a Yes if the file is code signed (has a digital certificate). Otherwise there will be a No.

The name of the organization that the digital certificate is issued to is displayed to the right of the Organization text field.

How to open the file information window
You can open the file information window by choosing the Show file information menu item in the List menu in Visual Installer’s editor, or by right-clicking over a file in the file list and choosing the Show file information menu item in the local menu that is opened.

You can now specify your own default folder for your project files

You can now specify your own default folder (start folder) for your Visual Installer project files (.VIP files). Normally is the Documents\Visual Installer\My Projects folder used as a default folder for Visual Installer’s project files, but now you can have your own default folder; for example D:\My VIP Projects, or whatever you want to have.

File - Open project
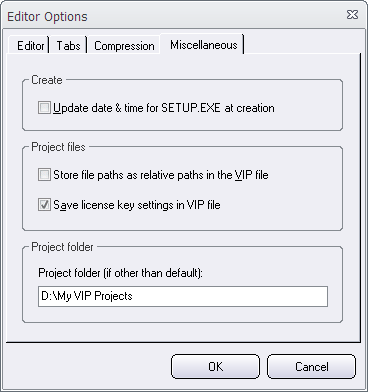
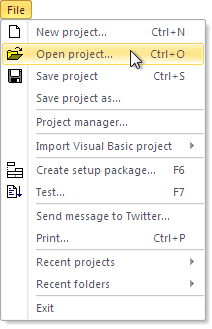
The default folder is used as a start folder when you have no project file opened in the Visual Installer editor, and want to open an existing project file (.VIP file), for example via the File – Open project menu item. The start folder is opened first. Thereafter you can browse to another folder on the drive if your project file is not located in the start folder.

(If you already have a VIP project opened in the editor, the folder where this project file was last saved in, will be used as a start folder.)

How to change the default folder for projects
You can set a new default folder via the Editor Options dialog box in Visual Installer. This dialog box can be opened by choosing the Editor options menu item in the Special menu in Visual Installer’s editor. A new default folder can be entered in the Project folder textbox (in the Miscellaneous tab). See the picture below for an example.

The Editor Options dialog box in Visual Installer

You must enter a full path to an existing folder in the Project folder text box. The drive letter must be included in the path.

If you want to use Visual Installer’s built-in default folder (Documents\Visual Installer\My Projects) as a start folder for your projects again, you can erase the contents in the Project folder text box. You only need to specify a folder in the Project folder text box if you want to use your own start folder.