How to create an INI file with settings in the main destination folder (Visual Installer)

With Visual Installer you can set initial settings for your application in different ways. One simple method is to store the settings in an INI file. INI files have existed since the first Windows version, and are still used today because they are simple to use and support all basic features for storage of settings that are needed.

In Visual Installer’s editor there is a dedicated tab that is used to handle data to INI files. The name of the tab is “INI files” and in the tab there are four buttons:

New file : Creates a new file.
Add section : Adds a section to the INI file.
Add value : Adds a value name and a value (for example a text string) to the INI file.
Variables : Shows a list of variables that can be inserted in the INI file.

To add/create a new INI file in your Visual Installer project, follow the steps below:

Step by step – How to add/create an INI file in your Visual Installer project

1. Open the “INI files” tab in Visual Installer’s editor.
2. Click the New file button in the “INI files” tab. The button is located in the bottom left.

The 'INI file' tab

3. Enter the filename of the INI file in the dialog box that is shown. E.g., “MySettings.ini“.

Create new INI file

4. Click OK.
5. A message box with a question is now shown, with the following text:
Do you want the INI file to be created in the main destination folder of the installation?
6. Answer Yes.
7. Now click the Add section button in the “INI files” tab.
8. Enter a section name. For example: “Directories“.

Add section to INI file

9. Click OK.
10. Now click the Add value button in the “INI files” tab.
11. Enter a value name and a value in the dialog box that is shown. For example:

Add value to INI file

12. Click OK.
13. The result, that is shown in the “INI files” tab, will look something like this:

INI file - Example

You have now created an INI file with some contents for your installation project. The INI file will be created in the main destination folder during the installation and the variables used in the INI file will be replaced with actual values when the INI file is created.

%DESTDIR that is used above is a variable that will be replaced with the installation’s main destination folder path during the installation. You can read more about %DESTDIR here.

The menu tools now support PNG pictures

Our menu tools (CD-Menu Creator 2026 and USB Menu Creator 2026) now support PNG pictures in menu interfaces. PNG is a modern picture format and have great support for transparency. Both full transparency and partial transparency.

PNG pictures can be used for the background picture, the logotype picture and the menu picture. But PNG pictures are especially useful for logotype pictures. Thanks to the great transparency support, the logotype is nicely combined with the background.

The two screen shots below show examples of that. A title and a PNG logotype has been added to each menu interface. The PNG logotype has been placed in the bottom right of each menu window.

Two menus with PNG logotype

Logotypes on websites are often in the PNG format. So if you already use a PNG picture for your website logotype, it can also be used on a menu interface created with our menu tools.

See also
> PNG pictures are now supported in menu interfaces

USB Menu Creator 2026 has now been released

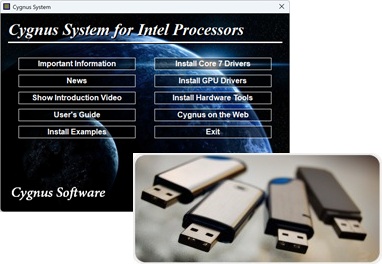
We have now released a new version of our USB autorun menu tool USB Menu Creator. The name of the new version is SamLogic USB Menu Creator 2026 and contains the following news:

PNG pictures in menu interfaces are now supported.
• Updated social media support: Supports now X.
• Updated social media support: Supports now Bluesky.
• More flexibility when setting letter case for file and folder names.
• Supports latest updates of Windows 11.
• All main binary files are now code signed with a DigiCert 4096 bit digital certificate.

If you want to create menu interfaces that support autorun for USB flash drives, you should choose this product instead of CD-Menu Creator. CD-Menu Creator can create menu interfaces for USB sticks, but it does not support autorun. USB Menu Creator does.

If you want to upgrade, you can do it via this order page.

CD-Menu Creator 2026 has now been released

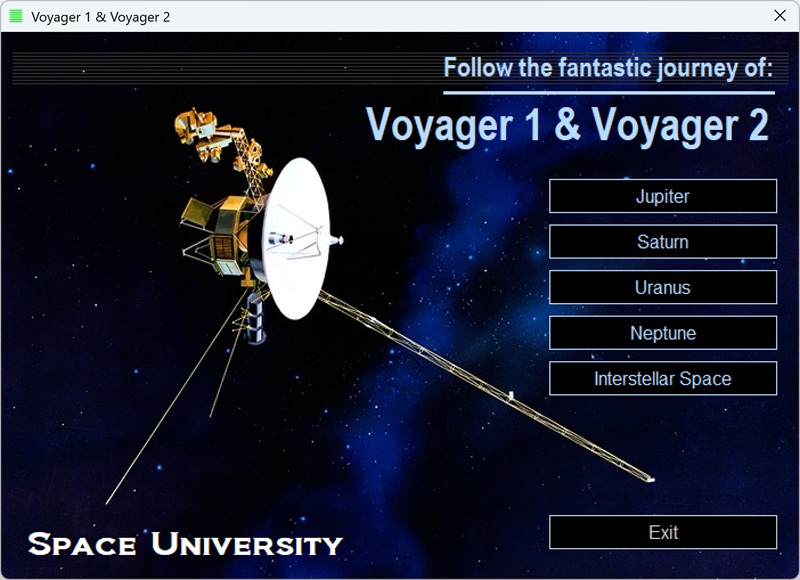
A new version of our menu designer tool CD-Menu Creator has now been released. With this tool you can create menu interfaces for CDs, DVDs, USB sticks and SD memory cards.

The name of the new version is SamLogic CD-Menu Creator 2026, and some of the new features in the new version are:

PNG pictures in menus are now supported. This picture format is very useful for logotypes etc.
• Updated social media support: Supports now X.
• Updated social media support: Supports now Bluesky.
• More flexibility when setting letter case for file and folder names.
• Supports latest updates of Windows 11.
• All main binary files are now code signed with a DigiCert 4096 bit digital certificate.

A detailed list with the new features is available on this information page.

If you want to upgrade, you can do it via this order page.

A French language file is now included in Visual Installer

In the latest update of Visual Installer 2025 we have included a French language file. So you can now use French text in your installation packages in an easy way.

French text

To choose French language to a setup project you must first open the Special – Language menu item in Visual Installer’s editor. And thereafter you choose the FRENCH.LNG language file in the list that is shown.

See also
> How do I change language for my setup dialog boxes?
> A German language file is now included in Visual Installer

An update of Visual Installer 2025 is now available

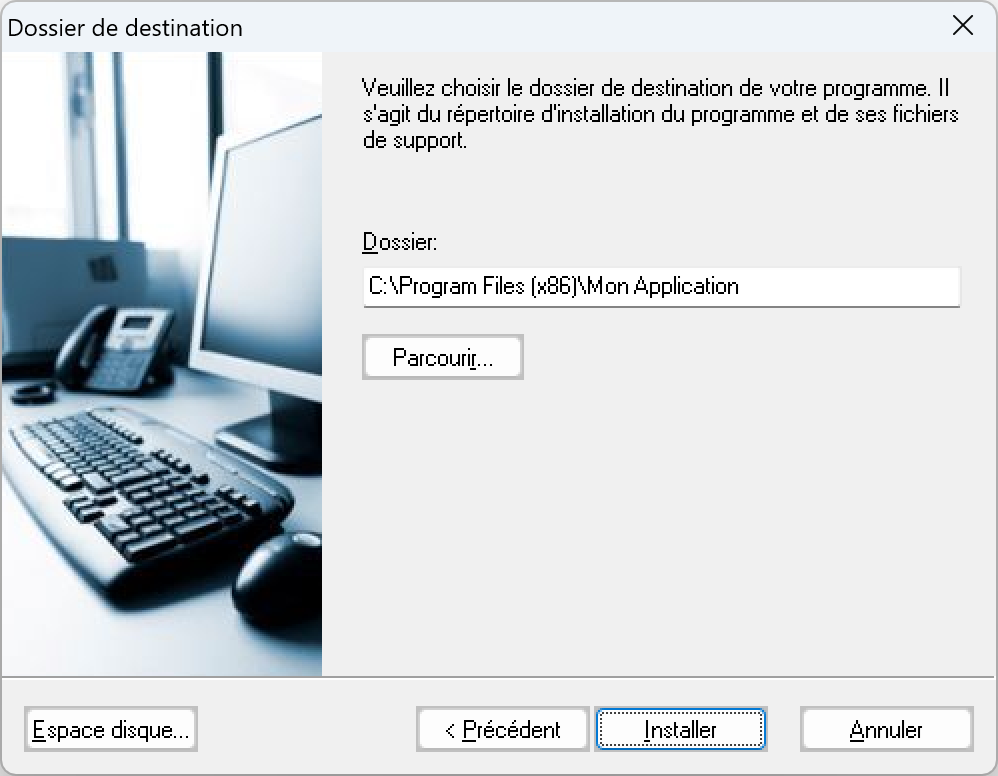
There is now an update of SamLogic Visual Installer 2025 available. The version number is 12.1.3, and some of the news and improvements in this version are:

– A French language file is included. (read more)
– The code signing functionality has been updated.
– All binary files are now code signed with a DigiCert code certificate.
– Improved editor support for unusual screen resolutions.
– A new script command: DELETEMENU. Deletes previous installed program groups/menus.

In addition to the above, some reported bugs has been fixed.

How to download the update
If you have Visual Installer 2025 and a 12 months maintenance plan you can download the update from the following download page:

> Download – Visual Installer 2025 – Latest update

If you have an older version of Visual Installer, for example Visual Installer 2022, you can upgrade to the latest version of Visual Installer from this order page:

> Upgrade to Visual Installer 2025

Visual Installer 2025 has now been released

We have now released a new version of our installation tool Visual Installer. The name of the new version is SamLogic Visual Installer 2025 and the version number is 12.1. Some new features in the new version are:

• A new column in the file list informs if a binary file is code signed or not.
• More than one code signing certificate in the same computer can now be handled.
• We have added a notes field to the “File list” tab in Visual Installer.
• You can now specify minimum memory requirements for your installation.
• The Windows compatibility function now also support Windows 7 and Windows 8.
• You can now specify screen position for a not maximized graphical setup window.
• Supports AutoCAD 2023 and 2024.
• The latest versions of the Microsoft Office applications are supported.
• The max length for source file paths for files in the file list has been extended.
• The version number for a created setup package can be updated automatically.
• Information from previous versions of installed programs can be cleaned at setup.

A detailed list of new features in Visual Installer 2025 is available on this web page.

MultiMailer 2024 has now been released

We have now released a new version of our e-mail / newsletter tool MultiMailer. The name of the new version is SamLogic MultiMailer 2024 and some new features in the new version are:

Phone• Clickable / callable phone numbers can be added to newsletters.
• More flexibility for buttons in newsletters.
• Standard fields/columns can be renamed.
X• Easier to edit pictures, links, titles & textboxes via new commands in the Edit menu.
• MultiMailer now supports X.
• MultiMailer now tests that the subject line of the e-mail newsletter is not too long.
Map• MultiMailer does more tests of links in newsletters before the e-mail delivery start.
• Supports the new email sender guidelines from Google and Yahoo.
• Links to (Google Maps) maps can be included in newsletters.
• New faster servers for handling of open/click statistics and for web copies of newsletters.
• Enhanced bounce rate control during e-mail delivery.

More Information
A detailed list of the new features in MultiMailer 2024 is available on this web page.

Many setup dialog box images included in Visual Installer

There are many ready-to-use images included in the Visual Installer setup creator that can be used together with the setup dialog boxes (the setup wizard) that are shown for the end-user during an installation. This video on YouTube shows some examples of dialog box images that are included in Visual Installer (click on the picture below to start the video):

Video

Additional information is available on this information page and on this tip page.

The best way to open an Excel File from a menu

You can open different kinds of document types from buttons in menu interfaces created with the CD-Menu Creator and USB Menu Creator tools. One document type that can be opened are Excel documents, and if you choose the menu command Open Excel File (see the picture below) you will get access to some special functionality that can be useful when handling Excel files. You can for example send command line parameters (switches) to Excel.

Open Excel File

With the Open Excel File command you can open the following types of Excel files: .XLS, .XLSX, .XLTX, .XLSM, and .XLTM.

You can open different kind of Excel files with the button command

By entering command line switches in the Parameters text box in CD-Menu Creator / USB Menu Creator, you can control how Excel files are opened in Microsoft Excel. For example, if you enter /r in the Parameters text box, the Excel file is opened in read-only mode.

Read more about available command line switches for Excel here:

> Command-line switches for Excel (opens a page on Microsoft’s website)

See also
> How to open a PDF document from a menu
> CD-Menu Creator’s button commands explained