The components in our toolboxes, for example SamLogic Calendar Components and SamLogic Internet Components, are based on the ActiveX technology. That’s a component technology that was introduced already in 1996 by Microsoft, but it is still supported by many tools, including the latest versions of Microsoft Visual Studio and Microsoft Office.
 In this blog post we will show how to add an ActiveX component (control) to a Visual Basic 2010 project by using Microsoft Visual Studio 2010. We will add our one month calendar component from the SamLogic Calendar Components tool box to the Visual Basic project.
If you want to use the calendar component in your own project you must install SamLogic Calendar Components first. But you can also consider this tip as a general step-by-step tip that shows how to insert an ActiveX component into a VB 2010 project. The steps are the same also if you add another ActiveX component to your project.
How to add an ActiveX component to a Visual Basic 2010 project
1. Start Visual Studio 2010 and open a Visual Basic 2010 project, or create a new project. The project type must be Windows Form Application.
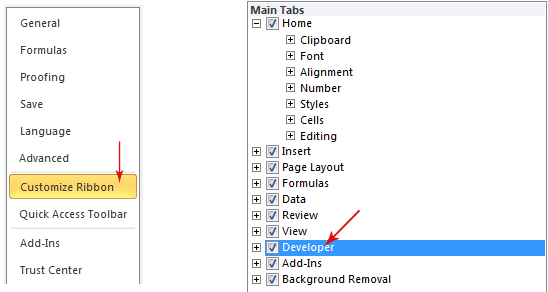
2. Right-click over the Toolbox window.
3. Select the Choose items menu item in the local menu that is shown.
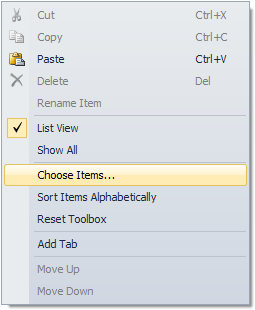
4. The Choose Toolbox Items dialog box is now shown. In this dialog box, open the COM Components tab.
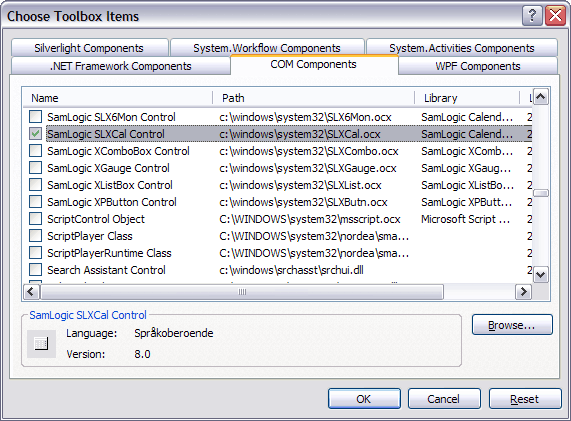
5. If you have installed SamLogic Calendar Components and want to use the 1 month calendar, select SamLogic SLXCal Control in the list (in the COM Components tab). Otherwise, select the ActiveX component that you want to use.
6. Click OK to close the dialog box.
7. The selected component should be visible in the Toolbox window; probably in the bottom of the window.
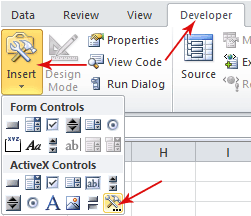
8. Now drag and drop the component on the Windows form, in the position that you want to have the component.
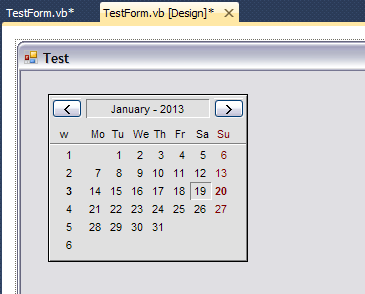
That’s all steps that we need. We have now included an ActiveX component into a Visual Basic 2010 project and put it on a form! You can use the ActiveX component in a similar way as a visual .NET component / .NET class.
The calendar component’s event handlers
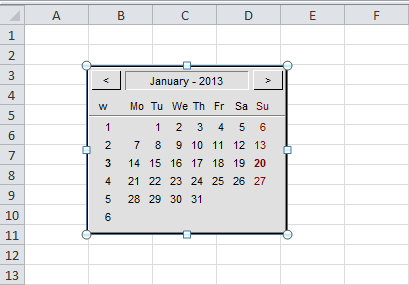
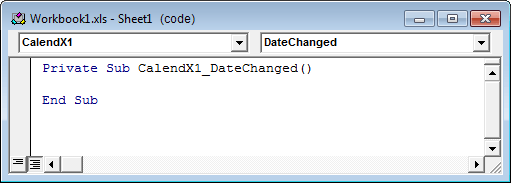
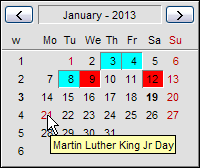
If you double-click on the calendar component in the form, the DateChanged event handler is created in the source code (as seen in the picture below):

The DateChanged event occurs when a user changes month in the calendar (for example by clicking on the right arrow). From the event handler dropdown list in Visual Studio’s source code editor you can choose another event handler for the calendar, for example the DateSelected event handler. The DateSelected event occurs when a user selects a date in the calendar by clicking on a date (day number) with the mouse button. There is also a DateDeselected event handler that is fired when somebody unselects a date (removes a selection) in the calendar, for example by clicking with the right mouse button.
More information about the one month calendar component
More detailed information about the one month calendar component in SamLogic Calendar Components, including a complete list of all properties, events and methods in the component, is available on this web page:
> One-Month Calendar Component (ActiveX)
In the next blog post
In the next blog post we will show how to insert an ActiveX component in an Excel sheet. We will use the same calendar component as above in the example, but the tip can also be used for other ActiveX components.

 USB Menu Creator is a new product from SamLogic Software that can be used to create AutoRun menu interfaces for USB sticks / pen drives. The created menu interface will be opened automatically when the USB stick is plugged into a USB port in the end-user’s computer. From the menu the end-user can start a setup program, run an application, open a document, play a video or Flash animation, open a web page etc.
 EV Code Signing, also called Extended Validation Code Signing, is a new
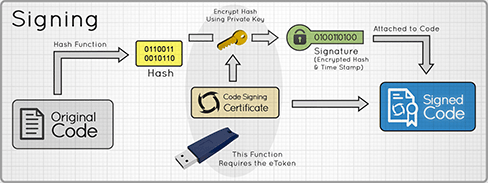
 Frederick Barton at the FindMySoft website has written a review of our product
 It is important to install an ActiveX component to the correct folder in Windows. If the ActiveX component is not a side-by-side component (can run side-by-side with a component with same filename) the component must be installed to Windows system folder, or to another shared folder. You should also make a version check before you install the component to the folder. A version check ensures that a component with a lower version number never replaces a component with a higher version number.
 Things are getting somewhat more complex in a 64 bit version of Windows operating system. In a 32 bit Windows there is only one system folder, but in a 64 bit Windows there are two system folders. One system folder is intended for 32 bit (executable) files and one system folder is intended for 64 bit (executable) files. It is important to copy the ActiveX component to the correct system folder, otherwise it will not be found by the application. The paths to the two system folders in a 64 bit Windows are the following: