Nowadays it is very important to code sign installation packages. This increases the security and gives less warning messages in Windows and in web browsers.
Since many years back our setup tool Visual Installer has supported standard digital certificates, but in the last update of Visual Installer we have also added support for EV digital certificates. EV digital certificates increases the security even more and the risk for warning messages in Windows and in web browsers (for example in Chrome, Edge and Internet Explorer) is reduced to almost zero. EV digital certificates are more trusted by Windows and web browsers than standard digital certificates.
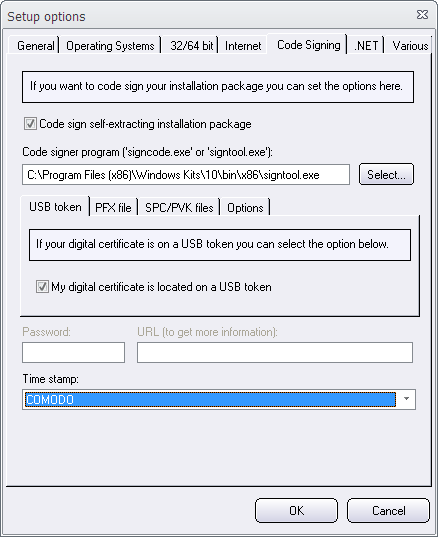
Updated ‘Setup Options’ dialog box in Visual Installer
The Code Signing tab in the Setup Options dialog box in Visual Installer has been updated to also support EV code signing. An EV digital certificate is always distributed on a USB token and we have added a new option to the Code Signing tab that handles digital certificates on USB tokens. The name of the new option is My digital certificate is located on a USB token and if you select this option, Visual Installer will get the digital certificate from the USB token when a setup package is created.
You can see the new My digital certificate is located on a USB token option in the dialog box picture below:
Alla binary files that are distributed are EV code signed
As an addition to the above, all SamLogic’s binary files that are distributed to end-users has been code signed with an EV digital certificate. This reduced the risk that Windows reacts (gives a warning message) after a setup package has been unpacked and all files extracted.
See also
> Article: Extended Validation (EV) Code Signing in Windows 8 / Windows 10
> Blog: The file information window now displays info about digital certificates