![]() There are some common questions about destination folders for binary files (EXE, DLL, OCX files etc.) in Visual Installer that we sometimes get asked from our customers. You will find the questions & answers below, and if you are new to Visual Installer we recommend you to read them:
There are some common questions about destination folders for binary files (EXE, DLL, OCX files etc.) in Visual Installer that we sometimes get asked from our customers. You will find the questions & answers below, and if you are new to Visual Installer we recommend you to read them:
Questions and answers:

#1
Q: Should I use the C:\Program Files folder or the C:\Program Files (x86) folder as a destination for my application file?
A: It depends of the bitness of your application. 32 bit applications should be installed to the Program Files (x86) folder and 64 bit applications to the Program Files folder.
However, Visual Installer will choose correct folder automatically for you, if you specify your application’s bitness in the 32/64 bit tab in the Setup options dialog box in Visual Installer.
![]()
You can open this dialog box by choosing the Setup options menu item in the Special menu.
#2
Q: How do I do in Visual Installer to install a file to the program files folder?
A: Installing a file to the program files folder (the Program Files or the Program Files (x86) folder) is easy done in Visual Installer, but you need to specify the settings for this in two steps:
Step one:
1. Open the File list tab in Visual Installer’s editor.
2. Click on the […] button to the right of the Main folder text box in the tab (it is located in the upper right part of the editor window).
3. Select the %PROGRAMFILES option in the dialog box that is shown (see the picture below).

4. Click the Select button.
5. Add (enter) a sub folder name after the %PROGRAMFILES variable in the Main folder text box. Below is an example:
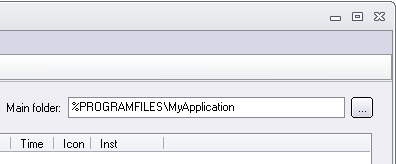
You have now specified the main destination folder for your installation. In the next step we will specify the destination folder for the specific file that you want to install.
Step two:
1. Choose the List – Add – Add files menu item in Visual Installer’s editor.
2. Select your file in the Add files dialog box.
3. Confirm that the text after the Folder text box is %DESTDIR in the following dialog box:
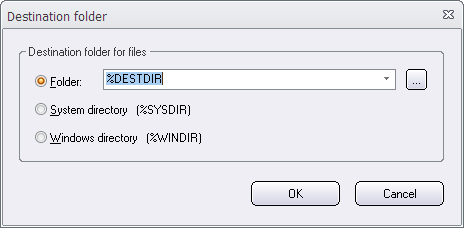
4. Click the OK button.
Now this file will be installed to the Program Files or the Program Files (x86) folder during the installation. If your application is a 32 bit application, the Program Files (x86) folder will be used as a destination. You can read more in this blog post and in this tip.
#3
Q: How do I install a file to the system folder?
A: If you have for example a DLL or OCX file that need to be installed to Windows’ system folder it can be done in Visual Installer. Follow the instructions below to do it:
1. Open the File list tab in Visual Installer’s editor.
2. Choose the List – Add – Add files menu item in Visual Installer’s editor.
3. Select your file in the Add files dialog box.
4. Select the System directory option in the following dialog box:
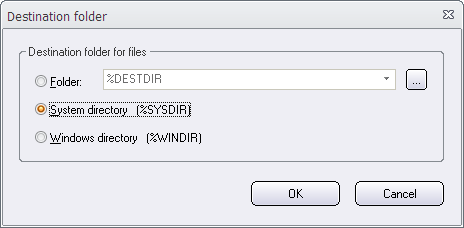
5. Click the OK button.
Now this file will be installed to Window’s system folder during the installation. The exact folder that is used depends of your installation project’s bitness (see question 1 above).
#4
Q: In some dialog boxes and other places in Visual Installer’s editor I see words like %PROGRAMFILES, %DESTDIR and %SYSDIR etc. What are they?
A: %PROGRAMFILES, %DESTDIR and %SYSDIR etc. are called variables. The name of the variable will be replaced with an actual text during the installation.
Variables are used when the actual text is not known, until the installation starts. Variables are usually used as a place holder for folder paths. For example the %PROGRAMFILES variable is a place holder for the program files folder in the system. When the installation starts, %PROGRAMFILES is replaced with the actual folder path. For example with C:\Program Files.
You can read more about variables in this blog post.
#5
Q: I have an international application. The name of the program files folder is different in different countries / languages. Can Visual Installer handle this?
A: Yes. Visual Installer will find the correct path to the program files folder regardless of country / language or version of Windows. You can read more in this blog post.
More information
![]() If you want more information about the settings in the dialog boxes above, you can press the F1 button on your keyboard when the dialog box is open. We recommend you also to take a look on Visual Installer’s tips and tricks pages:
If you want more information about the settings in the dialog boxes above, you can press the F1 button on your keyboard when the dialog box is open. We recommend you also to take a look on Visual Installer’s tips and tricks pages:

 One common operation is to copy or move files during an installation. There are commands available in Visual Installer’s script language that can do this. If you need to copy or move many files at once, you can use the MCOPY and MMOVE commands for this purpose. Below is the syntax of these two commands described:
 To give you a great flexibility when creating or updating AutoCAD profiles, we have added some special variables to the
 Spammers often try to use false domain names in the sender’s e-mail address, and to prevent this happen, a technology called SPF can used. By utilizing SPF you can reduce the risk of abuse of your domain name.
 If you are going to distribute a Microsoft Access database with your Visual Installer installation project, you probably want to install a corresponding Access runtime engine also, in your end-users’ computers. By installing an Access runtime engine, the end-users do not need to have the full Access version installed in their computers.