Using the log function in Visual Installer’s script language

When using the script language in Visual Installer, it may sometimes be useful to see in detail what happen when the script lines are executed. To get detailed information about the execution of script commands, you can activate a log function in Visual Installer’s script language. When the log is activated, detailed information about every script line that is executed are stored in a log file. Here you can see the contents of the parameters that are passed to the script commands and see the return value (for example error codes) of every command. If you use variables in the script (for example %DESTDIR) you can see their actual values.

How to activate the log function
To activate the log function, you can use the USELOG script command. To enable the log, enter the following in the beginning of your script code:

USELOG 1

As default, the log file is stored in the main destination folder of the installation (the folder path that is stored in the %DESTDIR variable) but you can also specify your own folder for the log file via parameter 2. For example:

USELOG 1, C:\MyLogFolder

To turn off the log, somewhere in the script, you can enter the following:

USELOG 0

If you want to log all lines in the script, you don’t need to turn off the log at the end. It will be turned off automatically after the last executed script line.

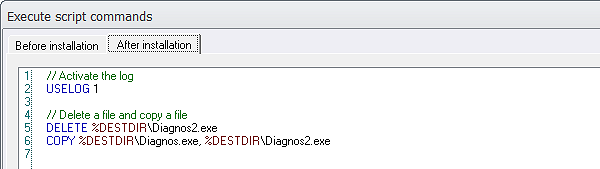
In the picture below, you can see an example of how the USELOG command can be used:

USELOG

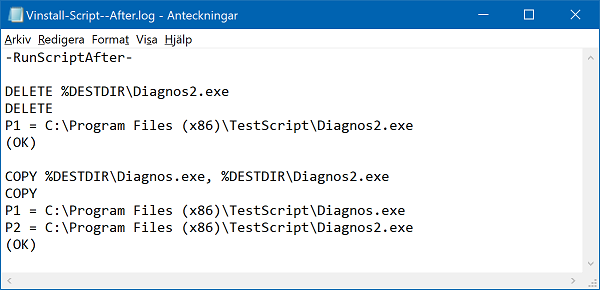
And below is an example of how the log file may look like:

Log (OK)

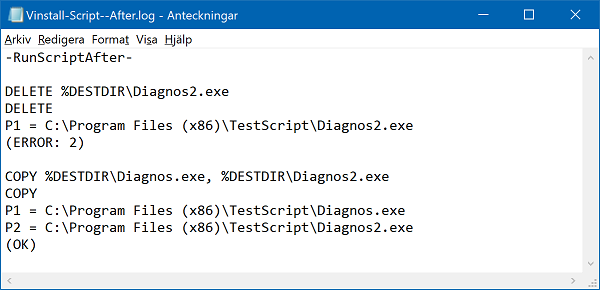
If a script command succeeds, it returns OK. Otherwise it returns ERROR and an error code. Below is an example of how the log file may look like if an error occurs:

Log (Error)

Most error codes can be found on this web page at Microsoft’s web site:

> Windows Dev Center: System Error Codes (0-499)

Some common error codes are:

2 : File not found!
3 : Path not found!
5 : Access denied!
183 : File already exists!

Filenames
The filename of the log file is Vinstall-Script–Before.log if the script lines are executed in the Before installation tab in the Execute script commands window in Visual Installer, and the filename is Vinstall-Script–After.log if the script lines are executed in the After installation tab in the same window. The filenames can not be changed, but you can change the folder where the log files are stored (as described above).

See also
> Visual Installer’s Scripting Language

Visual Installer: How to block a license key

In Visual Installer it is possible to block specific license keys from be accepted during an installation. This is useful when using prime number based license keys because they are created and verified mathematically. So if the license key is evaluated correctly, it will be accepted.

In Visual Installer you can create a block list with prime number based license keys that should not be accepted, although they are mathematically correct. This is done via the Block List dialog box in Visual Installer:

The 'Block List' dialog box in Visual Installer

In this dialog box you can enter a list with license keys that should not be accepted by Visual Installer during an installation. The block list is stored per installation project and is saved with the .VIP project file. So it is not a global block list. It only adds the block list to the specific installation project.

Where to find the ‘Block List’ dialog box?
You can open the Block List dialog box by following these steps:

1. Open the Dialog boxes tab in Visual Installer’s editor.
2. Click on the “” button to the right of the License key option.
3. Click on the More options button.
4. Click on the Block List button.

In the Block List dialog box that is now opened you can enter a list with license keys to block. One license key per row. You can also specify an information message that is shown to the user if he/she enters a blocked license key. If no text is specified, a default text is used.

Note
Both prime number based license keys and static license keys can be blocked with this method, although this function is most useful when used with prime number based license keys.

See also
> Visual Installer: Prime number based license keys
> Visual Installer can show visually when a license key is correct
> The setup wizard in Visual Installer

How to check that a file is dual code signed

In Visual Installer 2015 we added a new function that makes it possible to dual code sign setup files. You can read about the new function in the following blog post:

> Visual Installer now supports SHA-2 and dual code signing

Before you distribute your installation package it can be a good idea to check that the dual sign process succeeded. You can do it easily by following the steps below:

1. Create your setup package from Visual Installer.
2. Locate the setup package file via Windows Explorer.
3. Right-click on the file.
4. Choose the Properties menu item in the local menu that is opened.
5. Open the Digital Signatures tab.

If the file has been successfully dual signed, there should be two rows in the signature list:

Windows Properties window

The digest algorithms should be sha1 and sha256, as shown in the picture above. If there is only one row in the signature list, the dual code sign process failed or you have not set Visual Installer to dual code sign setup packages. Read this tip to get more information about how to change code sign settings in Visual Installer.

See also
> What is SHA-1 and SHA-2 and what’s the difference between them?
> How to code sign a setup package (Visual Installer tip)

The new Visual Studio 2017 will be released on March 7

Visual Studio 2017 Logo

According to Microsoft, the new Visual Studio 2017 will be released on March 7. Visual Studio 2017 is the latest version of Microsoft´s powerful suite of development tools. The first version of Visual Studio was released 1997, so Microsoft will also celebrate Visual Studio’s 20th anniversary when the new version of Visual Studio is released.

Microsoft Visual Studio 2017 includes enhancements to code navigation, IntelliSense, refactoring, debugging, Azure etc. And Xamarin is now integrated in the product which means developers can build Android, iOS and Windows apps directly from Visual Studio. The installation of Visual Studio is also faster and you only need to install the features that you need. Microsoft has also added new features to the C#, C++ and VB languages.

A detailed list of all new features and improvements in Visual Studio 2017 is available here:

> What’s New in Visual Studio 2017
> Visual Studio 2017 Release Notes

Visual Installer 2017 is compatible with Visual Studio 2017
Visual Installer 2017, that we released last week, is fully compatible with Visual Studio 2017 and Visual Basic 2017 (VB 15). This means you can import solution files and project files, that is saved with Visual Studio 2017, to Visual Installer.

Visual Installer 2017 has now been released

We have now released a new version of our setup tool SamLogic Visual Installer. The name of the new version is SamLogic Visual Installer 2017 and the version number is 11.0. Some new features in the new version are:

• The support for Windows 10 has been improved.
• Supports Visual Basic 2017 / Visual Studio 2017.
• Supports AutoCAD 2017.
• Supports Microsoft .NET Framework 4.6.2.
• Supports Microsoft Edge.
• The file information window now displays info about digital certificates. Read more.
• Line breaks can now be included in message boxes that are opened via script. Read more.
• You can specify your own default folder for your Visual Installer project files. Read more.

A detailed list of new features in Visual Installer 2017 is available on this web page.

The file information window now displays info about digital certificates

Today it is important to code sign binary files (for example .EXE and .DLL files) before distribution. We have therefore updated the file information window in Visual Installer so it is easy to check if a file in Visual Installer’s file list is code signed or not. The picture below shows the updated file information window:

The File information window in Visual Installer

To the right of the Code signed? text field there will be a Yes if the file is code signed (has a digital certificate). Otherwise there will be a No.

The name of the organization that the digital certificate is issued to is displayed to the right of the Organization text field.

How to open the file information window
You can open the file information window by choosing the Show file information menu item in the List menu in Visual Installer’s editor, or by right-clicking over a file in the file list and choosing the Show file information menu item in the local menu that is opened.

You can now specify your own default folder for your project files

You can now specify your own default folder (start folder) for your Visual Installer project files (.VIP files). Normally is the Documents\Visual Installer\My Projects folder used as a default folder for Visual Installer’s project files, but now you can have your own default folder; for example D:\My VIP Projects, or whatever you want to have.

File - Open projectThe default folder is used as a start folder when you have no project file opened in the Visual Installer editor, and want to open an existing project file (.VIP file), for example via the File – Open project menu item. The start folder is opened first. Thereafter you can browse to another folder on the drive if your project file is not located in the start folder.

(If you already have a VIP project opened in the editor, the folder where this project file was last saved in, will be used as a start folder.)

How to change the default folder for projects
You can set a new default folder via the Editor Options dialog box in Visual Installer. This dialog box can be opened by choosing the Editor options menu item in the Special menu in Visual Installer’s editor. A new default folder can be entered in the Project folder textbox (in the Miscellaneous tab). See the picture below for an example.

The Editor Options dialog box in Visual Installer

You must enter a full path to an existing folder in the Project folder text box. The drive letter must be included in the path.

If you want to use Visual Installer’s built-in default folder (Documents\Visual Installer\My Projects) as a start folder for your projects again, you can erase the contents in the Project folder text box. You only need to specify a folder in the Project folder text box if you want to use your own start folder.

An update of Visual Installer 2015 is now available

There is now an update of SamLogic Visual Installer 2015 available. The version number is 10.5.16, and some of the news and improvements in this version are:

• The code signing function in Visual Installer now supports SHA-2 and dual code signing (SHA-1 + SHA-2). Windows 7 and later requires SHA-2 for setup packages that are code signed from January 1, 2016 and later. Read more.

• Improved support for Microsoft .NET Framework. Now are also sub versions of .NET Framework supported (for example version 4.5.1, 4.5.2 etc.). And you can let Visual Installer download and install a specific version of .NET Framework, if it is missing in the end-user’s computer. We have added a mini wizard that handles this. Read more.

• Easier to register a type library for a .NET assembly. Read more.

• A new setup dialog box has been added to Visual Installer’s setup wizard: User Options. It’s a general option dialog box where the user can select and unselect options that you have created and added to the installation project. These options co-operates with condition statements in Visual Installer’s scripting language and Visual Installer’s Registry tab. Read more.

• It is now possible to import a VB.NET project that compiles a DLL rather than an EXE file.

• Visual Installer’s scripting language now supports ELSE. Read more.

• Visual Installer now supports environment variables. An environment variable can be expanded during an installation (for example in the Registry tab), and with a new script command, SETENV, that we have added to the script language you can set an environment variable to a specified value.

• The local (right-click) menu in the File list tab has been extended with a new menu item: Add more files from same source folder. This menu command is very useful if you want to add more files to the file list from a previously used folder in the file list. Read more.

How to download the update
If you have Visual Installer 2015 and a 12 months maintenance plan you can download the update from the following download page:

> Download – Visual Installer 2015 – Latest update

If you have an older version of Visual Installer, for example Visual Installer 2014, you can upgrade to the latest version of Visual Installer from this order page:

> Upgrade to Visual Installer 2015

Visual Installer now supports SHA-2 and dual code signing

Since January 1, 2016, Windows 7 and newer Windows will no longer trust software that is signed with a SHA-1 code signing certificate, if the software is downloaded from the Internet and the software is time-stamped with a value greater than January 1, 2016. This means that if you code sign a binary file (for example an EXE file) this year and uses SHA-1 as a hash algorithm, it will not be trusted in newer Windows. Instead you must use a SHA-2 (SHA-256) code signing certificate; then the binary file will be trusted by Windows 7 and newer. You can read more about this in the following articles on Microsoft’s website:

> Windows Enforcement of Authenticode Code Signing and Timestamping
> Deprecation of SHA-1 Hashing Algorithm for Microsoft Root Certificate Program

Updated Visual Installer
We have updated our installation tool Visual Installer to support SHA-2 (SHA-256) when it code signs a setup package. We have also updated Visual Installer to support dual signing, so you can code sign a setup package with both SHA-1 and SHA-2. This is very useful if you have software that should be able to run also in older Windows (for example in Windows XP). By code signing a setup package twice, first with SHA-1 and then with SHA-2, your code sign certificate will be useful in both older Windows and newer Windows.

How to change hash algorithm from SHA-1 to SHA-2
In Visual Installer you can change the hash algorithm from SHA-1 to SHA-2, for an existing project, by following the steps below:

1. Start Visual Installer
2. Open your project
3. Choose the Special – Setup options menu item
4. Open the Code Signing tab in the Setup options dialog box
5. Open the Option sub tab
6. Select the Use SHA-2 option

Code Signing - Use SHA-2

7. Close the dialog box

If your minimum system requirements is Windows 7, you can use SHA-2 as a hash algorithm. But if you also want to support older Windows, follow the steps below:

How to dual sign a setup package (SHA-1 and SHA-2)
1. Start Visual Installer
2. Open your project
3. Choose the Special – Setup options menu item
4. Open the Code Signing tab in the Setup options dialog box
5. Open the Option sub tab
6. Select the Use SHA-1 and SHA-2 (recommended) option

Code Signing -Use SHA-1 and SHA-2

7. Close the dialog box

When you open your project file
If you have installed the latest version of Visual Installer 2015 (version 10.5.16 or later) and opens a project file, you may see this message box when you open your project:

Update SignTool.exe

It is recommended to answer yes, so the latest version of Microsoft’s code signing tool is used when a setup package is code signed. If you want to dual sign a setup package, you must have a quite new version of the code signing tool. You can read more in this blog post.

Available in Visual Installer 2015 version 10.5.16 and later
The functionality described above is available in Visual Installer 2015 version 10.5.16 and later; in both the Standard and Professional versions of Visual Installer. If you have an active 1 or 12 months maintenance plan for Visual Installer 2015, you can download this update for free from our download page.

See also
> What is SHA-1 and SHA-2 and what’s the difference between them?
> How to code sign a setup package (Visual Installer tip)

Visual Installer: If a specific version of .NET Framework is missing

We have improved Visual Installer’s behaviour in situations where a required version of Microsoft .NET Framework is missing in a computer. Before you could choose between stop the installation or warn the user if a specific version of .NET Framework was missing in the end-user´s computer. But now you can also let the end-user download the missing version of .NET Framework from the Internet and install it. Or, if you distribute .NET Framework with your software, you can start an installation of Microsoft .NET Framework directly from Visual Installer.

This was partially possible already in earlier versions of Visual Installer / Professional using script commands, but now this can be done without script. You can choose if you want this behaviour by selecting an option in Visual Installer’s editor.

How it works
If Visual Installer discovers during the installation of your software that the required version of Microsoft .NET Framework is missing, a mini wizard is started. The mini wizard will help the end-user to start an installation of .NET Framework. Visual Installer pauses the installation until .NET Framework is installed. The pictures below show an example of how it may look like:

Step 1 – Initial information
Step 1

Step 2 – Download information
Step 2

Step 3 – Information about how to continue
Step 3

Where to find this new functionality?
You can turn on and off this new functionality by opening the SpecialSetup options menu item and opening the .NET tab:

Setup Options - .NET

In the .NET tab you will find a new option named Download and install .NET Framework. If you select this option, the new behaviour will be invoked if the required version of .NET is missing in the end-user’s computer. If you click on the Options button, you can set some options for this new function. You can for example specify your own download page if you don’t want to use the default download page at Microsoft’s website. You can also specify a language for the download page.

See also
> Visual Installer: More available versions of .NET Framework
> Tip: How to prevent an installation if wrong .NET version