Earlier this year we added the MSIEXEC script command to Visual Installer’s script language. MSIEXEC is used to run an MSI installation from a Visual Installer setup package. Windows Installer is used for the setup process. We have now added a new script command that functions like MSIEXEC but it is run during the uninstallation process instead. The name of the new script command is UNINSTALL_MSIEXEC.
Just like MSIEXEC, the UNINSTALL_MSIEXEC command takes three parameters:
%Filename : Full path to the MSI setup package
%Param : Command line parameters to send to Windows Installer
%Wait : Pause Visual Installer until Windows Installer is ready
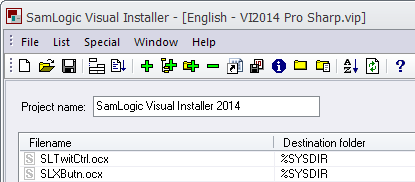
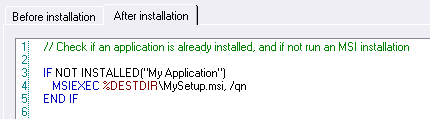
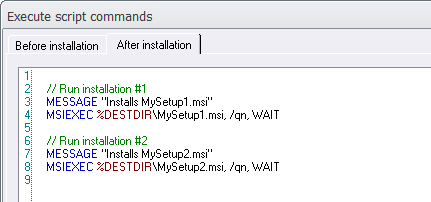
By combining MSIEXEC with UNINSTALL_MSIEXEC you will have a nice and easy way to support both installation and uninstallation of a MSI setup package in a single Visual Installer project. The picture below shows how to use these two commands in a Visual Installer project:
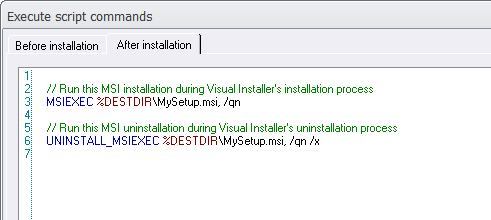
As you can see, only two lines with script code is needed to handle both an installation and uninstallation of a MSI setup package. MSI_EXEC is run during the installation process and UNINSTALL_MSIEXEC is run during the uninstallation process.
Tips
We have published tips on our website that explains in detail how to use the MSIEXEC and UNINSTALL_MSIEXEC command. Click on the links below to read the tips:
> Tip: How to run an MSI installation from script
> Tip: How to run an MSI uninstallation from script
 We have now released an update of
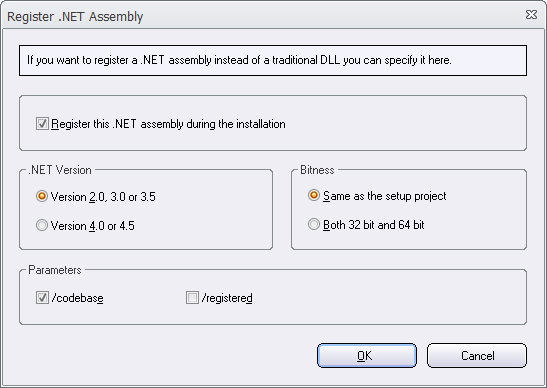


 A NET assembly is an application, component or class that is compiled for use with Microsoft .NET Framework. A NET assembly can have an .EXE filename extension or a .DLL filename extension. If the filename extension is .DLL, the assembly is a library assembly and can be used by other .NET code in an easy way. But the assembly can not be used from native (unmanaged) code, unless it is registered in the system and a COM object interface (a COM-callable wrapper) is added to the assembly. The new function that we have added to Visual Installer will make such a registration.
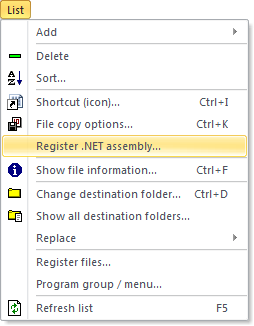

 The Professional version is also necessary if you need to handle prerequisites during an installation. From Visual Installer / Professional you can run other installations during the installation process in a controlled manner. If you need to install 64 bit applications, you must also use the Professional version. The Standard version only support installation of 32 bit applications.
 More information about MSIEXEC
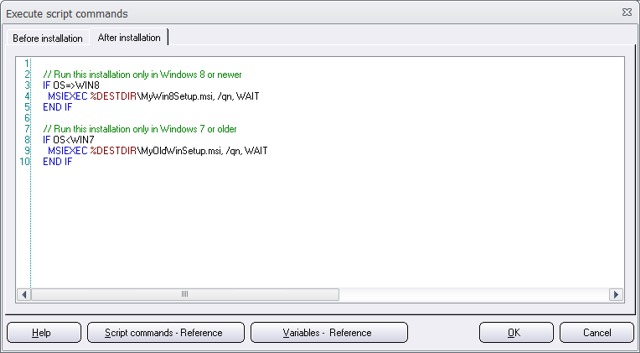
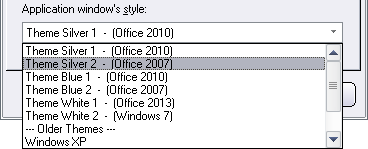
 All of SamLogic’s programs, and other tools, are now adapted to the new Microsoft Windows 8.1. But the software also work fine with Windows XP, Windows Vista, Windows 7, and some other older operating systems. If you want more information about a specific product, you can click on a link below: