Visual Installer: How to change registration order during setup

When you install files using Visual Installer, files are normally registered in the order that they appear in the file list. But sometimes this may create a problem, if one file is dependent of another file, and they are registered in the wrong order. To handle a situation like this there is an option in Visual Installer that allows you to register files in a particular order.

If you want to specify in which order files should be registered, you can choose the List – Register files menu item.

The Register files dialog box is then shown (see the picture below). In this dialog box you can specify the registration order by entering one file path per line. Each line must contain an installation path to every file that you want to have registered in another order than the default order. You can use variables in the file path (for example: %SYSDIR\MyDLL1.dll).

Line 1 is registered first. Then line 2. Then Line 3. Then line 4. Etc.

All files that you specify in the Register files dialog box are registered before any file in the file list is registered. So the list in Register files dialog box is handled first.

More information
Additional information is available in Visual Installer’s Help documentation. Click on the Help button in the Register files dialog box to obtain more information.

More tips
More tips for Visual Installer are available on this web page.

How do I create a system with multiple menus in CD-Menu Creator?

It is very easy to create a single menu window with CD-Menu Creator. Normally you can create such a menu interface in just minutes. But sometimes a single menu window is not enough. Sometimes you also need some sub menu windows with additional buttons, because all of the buttons that you want to add will not fit in a single menu window. The buttons are too many.

This situation can also be handled with CD-Menu Creator. With CD-Menu Creator you can create a menu system with many menu windows. For example, a main menu and some sub menus. You can create so many levels with menu windows that you want, but usually only 2 or 3 levels with menu windows are necessary.

We have published two detailed tips on our web site that show how to create a menu system that contains a main menu and some sub menus. The first tip shows how to create a menu system with two levels of menus. The second tip shows how to create a menu system with 3 levels of menus (a system like in the picture below).

3 levels with menus

Read more on this page:
> Tip: How to create multiple menus on a CD or DVD

See also:
> Tips and Tricks for CD-Menu Creator

How to create an AutoRun menu for portable applications

What is a portable application?
Portable applicationsA portable application (portable app) is a computer program that you can carry around with you on a portable device and use it on any computer. It does not require any installation, you simply plug your USB flash drive, portable hard drive, iPod, iPad or other removable drive into the computer and run the program. A portable application can be a game, or a utility program such as a text editor, email client, web browser, antivirus software, backup tool etc. or similar.

A portable application gives you access to your software and personal data just as you would have on your own PC. However, all the portable application settings and data are stored on your external drive so when you unplug it, none of your personal data is left behind. Furthermore, the computer you run your portable application on does not get affected as all data is saved on the drive from where you run your application.

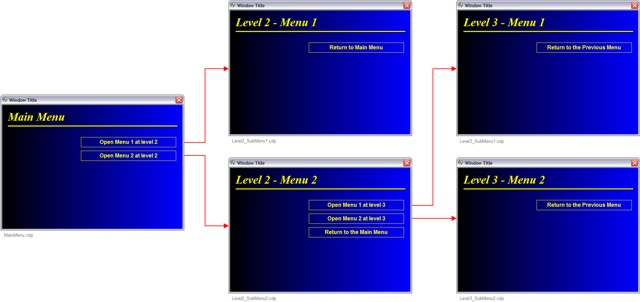
A portable menu will give an easy access to the portable applications
A portable menu will provide you with a simple way to access your portable applications. You only have to plug in the device and open the menu interface, and thereafter all applications are just one click away. You don’t need to browse the drive and its folders using Windows Explorer (or similar software) to find a particular application.

An AutoRun menu will make it even simpler
USB stickAn AutoRun menu will take this one step further. You don’t need to open the portable menu manually – the menu interface will be opened automatically when your portable device (for example a USB stick) is plugged into the computer. And thereafter you can launch one of the portable applications with just one mouse click.

Create an AutoRun menu with USB Menu Creator
SamLogic provides you with an easy solution to create an AutoRun menu for your portable applications: USB Menu Creator. USB Menu Creator gives you the possibility to create an AutoRun menu for USB sticks / flash drives. That means that your created menu will be shown automatically on the screen after plugging your USB stick into the computer’s USB port. All you need to do is to choose the application you want to run.

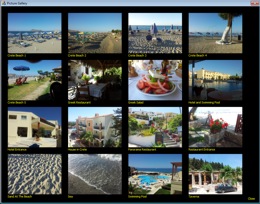
With USB Menu Creator you can easily design and personalize your portable application’s menu interface so it fits your needs and desires. USB Menu Creator offers you a wide range of effects such as shadows, glass effects, 3D effects, a large palette of graphical button styles, it allows you to place hyperlinks, hotspots, images or videos in your menu and even add different music and sound effects. The picture below shows an example of how an AutoRun menu interface created with USB Menu Creator may look like:

AutoRun menu for portable applications

When you want to start an application, just click on one of the buttons in the menu interface.

Wait a minute; doesn’t Microsoft removed AutoRun support for USB sticks?
That is correct. Window’s AutoRun function does not work with USB sticks anymore. So if you plug your current USB stick into a random computer, nothing will be run automatically. But we have developed an alternative system that gives back Autorun to USB sticks. If you use our USB Menu Creator software to add menu interfaces to USB sticks, they will support AutoRun.

Compatible with Windows 8, and Windows XP / Vista / 7
USB Menu Creator can create menu interfaces for portable applications that are compatible with all modern Windows operating systems, including Windows 8, Windows 7, Windows XP and Windows Vista. The menu interface picture above shows an AutoRun menu, created with USB Menu Creator, that is run in Windows 8.

More information
More information about USB Menu Creator is available on the tool’s product page:
> SamLogic USB Menu Creator – Product Page

How to complete MSI installation #1 before #2 starts (when running multiple installations)

Sometimes it is necessary to run and complete one MSI installation before the next MSI installation starts. This may happens if your software is dependent of some specific prerequisites, also during the installation. One common problem is that one component can not be installed and registered in the system, in a proper way, before some basic components that it needs are installed first. The installation of these basic components must be completed first, otherwise the next installation may fail.

It is possible to create setup packages where one installation is completed before the next one starts, but this can normally be tricky to achieve. But with the new script command MSIEXEC that we have added to Visual Installer, this is very easy done.

The MSIEXEC command is used to install MSI packages and MSIEXEC has a parameter with the name %Wait that is useful when multiple MSI setup packages need to be installed, and they must be installed in a specific order. If you set this parameter to WAIT Visual Installer will pause its own setup process until the installation of the MSI package is completed. Thereafter the installation (for example processing of more script lines) will continue.

Example
Below we will show you an example of how to use the MSIEXEC command.

MSIEXEC

In this example Visual Installer will first install MSI file #1 (MySetup1.msi), waits until the installation of the MSI file is completed, and then install MSI file #2 (MySetup2.msi), and wait until this installation is completed, and then continue the rest of the installation.

(The script command MESSAGE can be used to inform the user what happens during the setup process. If the MSI installations are time consuming it can be a good idea to inform the user that another installation is running for the moment.)

More information about MSIEXEC
For more details about the new MSIEXEC script command, and for more examples of usage, see this tips & tricks page:
> Tip: Run MSI installation from script

See also
> Visual Installer: New script command that handles MSI installations

Visual Installer: How to add a shortcut to an application

If you use Visual Installer to install an application, it is very likely that you want to add a shortcut to Windows’ Program menu, and maybe also to Window’s desktop, that starts the application when the user clicks on the shortcut.

List - Shortcut (icon)

We have published two tips on our tips & tricks pages for Visual Installer that describes how to create a shortcut to a program that is installed with Visual Installer. The first tip explains how to add a shortcut to Window’s Program menu, and the second tip explains how to add a shortcut to the desktop in Windows. Click on the links below to read the tips:

> Tip 1: How to add a shortcut to a program file
> Tip 2: How to create a desktop shortcut

Visual Installer: Where do I handle my setup dialog boxes?

The setup dialog boxes (the setup wizard) is a very important part of an installation. Via these dialog boxes you can give the user important information about the installation and let the user choose for example an installation folder, drive, program group, or ask for a license key or password. The setup dialog boxes are also a good opportunity to give your users a great first impression of your product or your company.

In our installation tool Visual Installer the setup dialog boxes are handled in the Dialog boxes tab of the editor (see the picture below).

Visual Installer

The following tip page will explain for you in detail how to choose setup dialog boxes to an installation, how to add text to the setup dialog boxes and how to change image for the setup dialog boxes. If you are new to Visual Installer we recommend you to read this tip page:

> Setup dialog boxes: How to choose dialog boxes, add text & change image

Video: Getting Started with Visual Installer

We have published a tutorial video on our website that helps you get started with our easy-to-use installation tool Visual Installer. The video shows how to create a basic setup project; for example how to start a new project, how to choose an installation folder for an installation, how to add files and how to specify texts for the installation dialog boxes. The video also shows how to save a project and how to build (compile) a setup package.

Getting Started with Visual Installer

Click here to watch the videoYou can view the tutorial video on this page:
> Getting Started with Visual Installer – Video

The tutorial is also available as text based tip pages. If you prefer the text version of the tutorial, you can go to this webpage:
> Getting Started with Visual Installer

CD-Menu Creator: How to use the Picture Gallery

We have added a new tip to the Tips & Tricks section of our web site. The tip explains how to use the Picture Gallery feature in SamLogic CD-Menu Creator.

The Picture Gallery is a special window that displays all images in a specified folder on a CD, DVD or USB flash drive. It can also be used to play videos.

Click here to read the tip. The tip assumes that you have SamLogic CD-Menu Creator 2014 or later installed in your computer. If not, you can download a trial version of CD-Menu Creator from this download page.

How to use SamLogic’s Windows applications on a Mac

We are often asked about if our programs are available in Mac versions. Even though we have no dedicated Mac versions of our programs, you can still easily use them on a Mac (Macintosh) computer. All you have to do is to install a virtualization software on your Mac that allows you to install and run Windows on it. With help of such virtualization software you can use our programs on a Mac just as you would do it on a PC with Windows. The virtualization software lets you run Windows and Mac OS X on your computer at the same time. This has several other advantages, such as allowing you to copy data between programs running on different operating systems.
SamLogic's Windows applications can also be used on a Mac
There are several available virtualization programs that you can use. Among the best ones are VMware Fusion, Parallels Desktop and Oracle VirtualBox.

Apple has developed its own product called Boot Camp that allows running Windows operating system on a Mac. However, Apple’s Boot Camp requires to reboot your computer when switching between Windows and Mac OS X which it is not very smooth. Boot Camp is included in Mac OS X version 10.5 and later.

To read more about Apple’s Boot Camp and how it is used, click here:
> Using Windows on Mac via Boot Camp

Visual Installer 2014: How to change user interface

In the previous blog post we informed about Visual Installer’s new user interface and the possibility to change visual theme for the user interface. In this blog post we will show how to change visual theme for the user interface.

If you want to change the visual theme for the editor, follow these steps:

1. Start Visual Installer
2. Open the Special menu
3. Choose the Editor options menu item
4. Open the Application window’s style combo box

Application window's style

5. Select the style / theme that you want to use
6. Click OK

Below you can see some samples of the visual themes included in Visual Installer 2014:

STYLE: Theme Silver 1
Theme Silver 1

STYLE: Theme White 1
Theme White 1

STYLE: Theme Blue 1
Theme Blue 1